Unit Datasheet Creation
THIS IS A WORK IN PROGRESS. THE INFORMATION IS MOSTLY UP-TO-DATE, BUT NEW VERSIONS OF THE DATASHEETS NEED TO BE UPLOADED.
Datasheet Breakdown
Once your Model is complete and ready for battle, open up the blank Datasheet that corresponds to your Unit's Core Type. This can be found by determining what kit the Unit's chest piece came from. If the chest piece is from the Alto kit, then the Core Type will be Alto. If the chest piece is from the Revernova kit, then the Core Type will be Revernova. If you have multiple chest pieces on your unit OR none at all, you may pick one that best fits your Unit.
Once you have downloaded the correct datasheet, you will need to document all of your Core Sections, Weapons, Mounted Weapons, Equipment, Shields, Systems, and Mods. It may look like a lot but we will break everything down into segments.
Before we get into how to create a Datasheet, we will first identify each area on the Datasheet itself.

- Core Sections - Each Unit is made up of different sections. Each section has a max defense and current defense. The max defense is the maximum amount of damage that section can withstand before being destroyed. The current defense is a blank area that should be used when damage is taken but the section remains in-tact. The remaining defense value should be written here. At the bottom is Total Defense. All Core Sections will combine their Max Def. and the value will be written here.
- Modified Stats - This shows Accuracy, Assault, & Evasion stats. Accuracy is for long-ranged targets. Assault is for close-range targets, and evasion is for evading incoming attacks.
Each one has a base stat value under the larger modified value. Base stats derive from the Core Type. The modified stat references the base stat AFTER it's been modified by the player. Depending on the pilot's rank, the player gets Stat Reduction Modifiers (SRM for short). These points allow the Units base stats to be lowered to better fit the players' play style. The lowest modified stats can be is 2 for each stat (or 2/2/2) and the highest cannot go past their original base stats. Systems, Mods, and Traits can also modify stats. - Core Type - Determines the base stats of the Unit. These can be found inside the modified stats section. Core type is determined by what chest piece is used in the creation of the mech. Each Core Type has different stats. They are represented by an image in this box.
- Specifications - This shows the Units Classification, Base Action Points, Standard Movement, and Thruster Movement. Classification is based off of the Units Total Defense value and determines Base AP and Standard Movement. Base AP is how many Action Points a Unit has before they make an AP Roll* during gameplay. Standard Movement shows the maximum amount of hexes a Unit can move during its turn. Thruster Movement is only available for Units with thrusters.
- Systems, Mods, & Traits - These are special abilities and bonuses that a player can use the further customize their Unit. Systems become available for a Unit based on what they have physically on the model. Mods and Traits are non-physical abilities/bonuses based on various factors. The amount of Mods and Traits a player can use is limited by the pilot's rank. Systems are only limited to the 7 slots available to them as long as their requirements are met.
- Weapons & Equipment Inventory - This is where all of the Units' weapons, mounted weapons, thrusters, Shields, and equipment are identified. Along the top, you will see 9 columns. These columns identify the specifics of each weapon.
At the bottom of the inventory, you will also see Total Thruster Durability and Total Inventory DC. If a Unit has thrusters, you would combine all of their durability here. As for the Total Inventory DC, you simply combine the DC of everything in your inventory and put the value in the dedicated area.- Name - What you call the weapon.
- Tags - Category, requirements, and/or bonuses for the weapon.
- Location - Where the weapon is located on the Unit. Head, Torso, Left Arm, ETC.
- Range - How many hexes the weapon can fire from.
- Base Damage - How much damage, per shot, the weapon does.
- AP (Action Points) - How much AP it costs to fire the weapon once.
- Type - Dictates if the weapon fires projectiles or pure energy.
- Durability - How much defense the weapon has until it is destroyed.
- DC (Deployment Cost) - How much it costs for the Unit to field the weapon.
- Deployment Cost - This is the total cost to field this Unit. This is the combined sum of the Units' Total Defense, Systems, and Total Inventory DC. This does not include the Pilots DC.
Core Sections
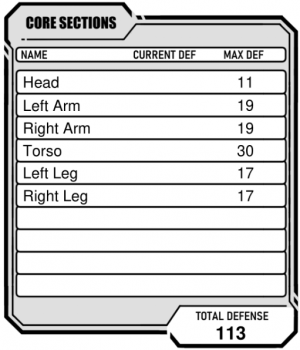
Each individual piece that makes up the Unit is considered a part. When you combine parts into limbs, heads, torsos, etc, these are called Core Sections.
First, you must identify how many Core Sections your Unit has and what each one is. Most Mech Units have a Head, Left Arm, Right Arm, Torso, Left Leg, and Right Leg as Core Sections. Feel free to use this as a starting point. You are only allowed 10 slots for Core Sections so if you run out of slots, you may need to combine sections.
Once you have listed each of your Unit's Core Sections, you will then need to determine the Max Defense of each one. To do this, you will need to open up the Parts & Data sheet. There is a tab with the name Parts Search. Here you can locate the stats for each part of your Unit by part name, kit name, or various other things. Once you are familiar with that, move to the Core Section Calculator tab. Here is where you will add the Name and Notation of each part that makes up a single Core Section. You don't need to use the calculator if you are already familiar with the process but it is recommended as it will get you familiar with the process of using our calculators.
On the top, you will see 3 titles: Name, Notation, and Defense. In the Name column, you will put down the name of the specific part listed on your Unit's model. Most parts share the same names, so in order to differentiate which part belongs to which model, we use specific model Notations.
Notations are broken down into what packs they come from and which unit they belong to. For example, PN-15 is the PortaNova-15. The Weapons Pack 1 for the Portanova is W1-15. Similarly, the Alto-17 is AL-17. The Weapons Pack for Alto is W1-17.
The Defense values are determined by which Unit is being used and what its purpose is. In this column, this is done automatically once the Name and Notation are added. The Defense value will only populate if the Name and Notation match exactly! If a value fails to auto-populate, check the spelling. If it still does not work, notify a Developer on the Discord then type the value in yourself.
You may have noticed that there are multiple parts of the same name. This is because most Units are symmetrical and use the same parts for both sides of the Unit- two arms and two legs. This organizational system helps with the design of asymmetrical Units.
The image on the right is an example of what a standard out-of-the-box Portanova-15 looks like when each piece is broken down and added to the Core Parts List.
Take note of how the parts are separated by the blue lines. This shows how the Core Parts are divided into their respective Core Sections (head, arm, arm, torso, leg, leg). Each individual part provides Defense to the entire Unit. We will come back to this later.
Sections
Weapon & Equipment
Located in the Parts List once again, there is a tab with the name Wpn/Eqp Builder. This is what you will use to stat out your Weapons & Equipment.
On the top row, similar to the Core Sections Calculator, you will see Name and Notation but this time there are more columns:

- Durability - How much defense each part has.
- Range - How far each part can attack.
- Base Damage - How much damage each part does.
- Action Points - How much AP each part costs to use.
- Type - If that part uses Kinetic or Energy attacks.
- System - What system comes with that part.
- Tags - What bonuses or requirements are associated with that part.
At the bottom of the page, there are 3 rows; Category, Requirements, and System. After you have added all of your parts you will need to choose what category it fits into and what system you want to take. There are a few different categories to choose from but you may only choose one.
- Weapon - A weapon that is in the hands of the Unit. Can be dropped and changed out for another weapon.
- Mounted Weapon - A weapon that is fixed to the Unit. Cannot be removed or changed.
- Equipment - Some parts will be designated as equipment. These give special bonuses to the Unit.
- Shield - Blocks incoming attacks.
- Thrusters - These give the Unit access to other abilities including the ability to fly.
- Melee - This is for weapons that are designated as melee weapons.
If you have any requirements, they will automatically populate in the designated row. You MUST take these. Once you have chosen your category and system, the Tags in the Total row will populate. Once all of the separate parts are added, the totals will be automatically calculated into the total row. This is the overall Weapon stats.
Below that, on the right-hand side, you'll see the Deployment Cost. This is automatically generated based on the weapon you have created.
Once you have the total stats for your Weapon/Equipment, transfer this information to the correct area on the Datasheet.
Additional Notes
The Name and Notation of each part need to match exactly as they do in the Parts List. If they don't, you will get an error. When the Name and Notation are correct, the Datasheet will auto-populate the parts' stats.
- Type - Determined by the overall number of Kinetic / Energy type parts that make up the Weapon. If there are 3 Kinetic type parts and 1 Energy type part, the Weapon will be Kinetic. If there are 2 Energy types and 1 Kinetic type, then the Weapon will be Energy. If there is an equal number of each part type, then the type with the highest Base Damage will determine the Weapon's type. [WIP]
- System - Weapons can only have 1 attached at a time. If multiple Systems are available, choose one to use and disregard the others.
- Tags - Depending on the parts that make up your Weapon, it may have multiple tags. All tag rules must be followed when using the weapon. See Tags in the Core Rules
Weapons
Units in the game will use is broken down into these categories. [WIP]
Ranged Weapons
Any Weapon you create can be used by your Units. Weapons are broken down into 2 categories:
- Ranged Combat Weapons
- Melee Weapons
Ranged Weapons can engage targets beyond 1 hex. Melee Weapons can only engage targets from a single hex distance. Unless otherwise stated, all Weapons with a range of 1 are Melee Weapons. Both categories can be further broken down into 2 types: Kinetic and Energy. Generally speaking, Kinetic Weapons deal less Base Damage but also require fewer Action Points to use, while Energy Weapons deal more Base Damage at the cost of more Action Points. This isn't always the case, especially when dealing with custom Weapons. [WIP]

Above, you see an example of a custom Weapon. At a glance, you can see that this Weapon has long range and massive Base Damage at the cost of high AP. Along with the Weapon type and Deployment Cost, you can also see that this Weapon has two Tags: [WN] and [2H]. This indicated to us that this is a ranged weapon that is being held with two hands.
When filling out the Unit's Datasheet (or a Custom Card [WIP thing]) be sure to include all of the information in the "Total" row.
Melee Weapons
Mounted Weapons
Equipment
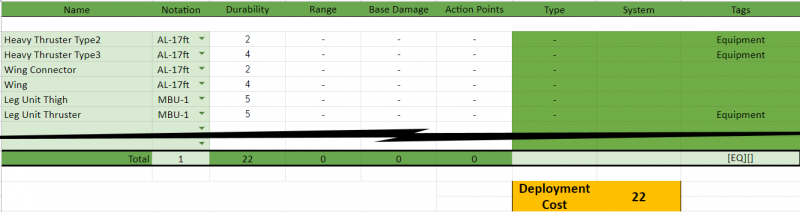
Similar to Weapons, Equipment is used to aid a Unit in combat. Equipment ranges from Radar to Drones and is mainly used as a utility for the Unit. When making Equipment, most single-use parts (parts that already have a single specific use) are given the Equipment tag [EQ] to clearly identify themselves from other parts in the parts list. The majority of these provide some kind of ability that may be added to your Unit to give it an advantage.

In the example above, we see a single Smoke Discharger. Notice in the Total row how the only fields that are filled in are Durability, Systems, & Tags. This is one of those single-use parts. The only real benefit this provides to a Unit is the System that it provides: Smoke Screen.

When adding thrusters to the Equipment list, it is important to group them by location strategically. If you choose to group all of your Thrusters into a single section, it will increase their durability, but doing so may make them a bigger target! Alternatively, you can split them up onto separate sections to make them harder to hit at the cost of Equipment list space.
For example, the Alto Flight type has wings and thrusters connected to its torso. These will be broken down into two sections: a left-wing section and a right-wing section. Each section is made up of exactly the same parts so you only need to use the calculator for this once. You will, however, need to add the two sections to the Equipment list so your Deployment Cost and Durability are accurate!
Datasheet Examples
| Core Rules | |
|---|---|
| Core Rules | Unit Datasheet Creation | Abilities | Lore | |
