Core Rules: Difference between revisions
| (85 intermediate revisions by 2 users not shown) | |||
| Line 1: | Line 1: | ||
== Introduction == | == Introduction == | ||
The 30 Minute Missions: Wargame is | The 30 Minute Missions: Wargame (30MM:W for short) is a mech-based tabletop miniatures game using Bandai Spirit's 30 Minutes Missions line of 1/144 scale mecha model kits. The focus of this game is on: | ||
* The ability to play missions in, roughly, 30 minutes (excluding setup); and | |||
* The customizability and modular designs for model kits. | |||
The game is played over a series of rounds. Each round consists of alternating turns between each player choosing one of their Units, moving to the best position, attacking the enemy, or holding an objective. The battlefield is played with varying terrain, elevations, and structures. Missions can vary from eliminating the enemies to securing intel. | |||
== Objective == | |||
The game is won after the primary objective of the mission you are playing has been completed. These range from holding an objective for multiple turns, getting an object and moving to your side of the board, or simply destroying the enemy forces. | |||
The game is won after the | |||
== Required Components == | == Required Components == | ||
[[File:New Board 1.png|thumb|right|450px|The hex game mat is roughly 40x60” with 4.5” hexes (vertex to vertex) setup in an 11 hex by 15 hex grid with the flat sides horizontal.]] | |||
* 30 Minutes Missions Models (assembled) | |||
* Datasheets (filled out) | |||
* Hex Grid Game Mat | |||
* Game Tokens | |||
* D8 Dice | |||
* D20 Dice | |||
* Various Hex Colors | |||
=== Units and Squads === | |||
Each individual model on the battlefield is referred to as a Unit. All Units controlled by a single player together make up that player’s Squad. | |||
When a rule refers to a Unit, it applies only to that specific model. When a rule refers to a Squad, it applies to all of that player’s Units collectively. | |||
=== Dice === | |||
To play the 30MM: Wargame, you will need two types of dice: eight-sided dice (D8) and twenty-sided dice (D20). Each player should have at least 5–10 D8s to keep gameplay fast and 1 D20 for every Unit they control. | |||
The D20 is used to track a Unit’s Action Points (AP), while the D8 is used for all attack, defense, and ability rolls. | |||
Occasionally, the rules may reference alternate dice notations such as D4, 2D8, or D8 + 1: | |||
* D4: Roll a D8 and halve the result, rounding up. | |||
* D8 + 1: Roll a D8 and add 1 to the result. | |||
==== | ==== Rolls and Rerolls ==== | ||
A | When making a roll, the player must roll equal to or higher than the target value listed under the Unit’s Modified Stat on its Datasheet. Each roll represents a single attack, defense, or action attempt. | ||
Example: Unit A makes two ranged attacks against Unit B, which has a Modified Evasion Stat of 7. | |||
The defending player rolls 2D8, scoring a 6 and a 7. | |||
This means one attack hits (6) and one attack is evaded (7). | |||
If an ability allows you to reroll dice, select the number of dice indicated and reroll them, starting with the lowest results first. The outcome of the reroll is final, even if it is worse than the original roll. | |||
=== Tokens === | |||
[[File:Active.png|thumb|right|175px|Active Token used to identify which Units are active or inactive.]] | |||
Tokens are used to track various effects, conditions, and states that occur during gameplay. | |||
Whenever a rule or status effect instructs a player to place a token, it should be placed face-up next to the affected Unit to clearly indicate the current condition. | |||
=== Objective Markers === | |||
[[File:30MM_War_Objective_Marker.png|thumb|left|250px|Objective Marker Designed by Discord Member, Nexus]] | |||
Objective Markers represent key tactical points, data nodes, or energy beacons on the battlefield that players must capture, defend, or destroy to complete mission objectives. | |||
The standard Objective Marker model is built using a combination of Roy Roy leg parts (from the 30 Minute Missions Alto or Portanova kits), thrusters from the Option Parts Set 1, and structural components from the J1 runner, included in most 30MM kits. | |||
Players may use Objective Marker tokens in place of the physical kit-built markers if preferred. Alternatively, an Objective Marker can be any model, piece, or object the players agree upon prior to starting the game, so long as all participants clearly understand what represents an active objective. | |||
When placed on the map, Objective Markers do not obstruct movement or Line of Sight unless specified by the mission. | |||
=== Datasheet === | |||
Each Unit is represented by a Datasheet, which contains all of the information required to operate that Unit effectively on the battlefield. The Datasheet lists every attribute, ability, and piece of equipment necessary to complete a mission. | |||
While Units can differ greatly in how they function, every Datasheet follows the same layout and includes the following modules: | |||
# Unit Sections – Displays each section (Head, Torso, Left Leg, etc.) of the Unit and its Durability Points (DP). | |||
# Specifications – Lists the Unit’s detailed attributes such as classification, base AP, movement (standard and thruster), as well as total thruster durability. | |||
# Modified Stats – The Unit’s Accuracy, Assault, and Evasion values, used when making Attack and Defense Rolls. | |||
# Core Type – Shows the Unit’s base model and core statistics. | |||
# Unit Information – Includes the Unit’s Name, Type, and Movement Mechanism(s). | |||
# Pilot Information – Lists the Pilot’s Name, Rank, and Pilot Cost. | |||
# Systems, Mods, & Traits – Details the Unit’s special abilities and upgrades. | |||
# Weapons & Equipment Inventory – Records all weapons, gear, and equipment equipped by the Unit. | |||
# Deployment Cost (DC) – The total cost required to field the Unit in battle. | |||
[[File:Datasheet v6.05.png|frameless|750px|center|Caption]] | |||
== Unit Information== | |||
=== Mechs === | |||
A Mech is a humanoid combat Unit characterized by articulated limbs, modular construction, and the ability to operate across various terrains and elevations. Mechs are designed for front-line combat, tactical flexibility, and diverse loadouts, capable of fulfilling multiple battlefield roles. | |||
Design Choices of Mechs: | |||
* Humanoid Frame: Possesses articulated arms, legs, and a torso, enabling advanced maneuverability such as jumping, climbing, or changing facing independently. | |||
* Combat Versatility: Capable of engaging in both ranged and melee combat; well-suited for precision attacks, flanking, and defensive holds. | |||
* Reactive Posture System: Can assume crouching, and prone positions as well as offensive, defensive, and parry stances to affect LoS, hit zones, and evasion. | |||
=== Vehicles === | |||
Vehicles are modular support Units designed to augment, transport, or reinforce Mech Units on the battlefield. They can operate independently or in tandem with other Units, often providing specialized mobility, firepower, or utility functions. | |||
Design Choices of Vehicles: | |||
{| class="wikitable" style="text-align:center; vertical-align:middle; background-color:#F8F9FA; color:#202122; float:right; margin-left:10px; " | {| class="wikitable" style="text-align:center; vertical-align:middle; background-color:#F8F9FA; color:#202122; float:right; margin-left:10px; " | ||
|- | |- | ||
! Total | ! Total Durability | ||
! Classification | ! Classification | ||
! Base Movement | ! Base Movement | ||
| Line 211: | Line 127: | ||
| 1d8 + 4 | | 1d8 + 4 | ||
|} | |} | ||
There are 5 different classifications that provide different starting bonuses and limitations based on the size of your Unit. This is determined by the Total | * Dedicated Support Platform: Mech Units can ride on/in various vehicles to move around the battlefield. | ||
* Modular Integration System: Can combine with Mech Units for additional firepower. | |||
=== | |||
=== Classifications === | |||
There are 5 different classifications that provide different starting bonuses and limitations based on the size of your Unit. This is determined by the Total Durability value of all of Core Parts combined. | |||
== Playing the Game == | |||
All missions take place on a battlefield overlayed by a hexagonal grid. A single hex measures 4.5” from point-to-point and 3.9” from side-to-side. This is the same size as an Action Base 4/5. A battlefield measures 14 hexes on the long side and 11 hexes on the short side (58.5”x38.3”). | |||
=== Setup === | |||
[[File:Engagementsize.png|frameless|right|400px|]] | |||
Players will first lay out a battlefield mat as preferred or, if playing a scenario, as the scenario specifies. | |||
Before determining turn order, all players must agree on the Engagement Size (the total Deployment Cost limit of all | |||
Units in a players squad). Once the Engagement Size is set, each player assembles their Squad accordingly. | |||
Next, players will roll a 1D8 to determine who goes first. The higher roll then determines who is the attacker or defender. The attacker gets to start first but the defender gets to choose which table side to start on (A or B side). If both players roll the same, then both players conduct a reroll. | |||
In a 3 (or more) player game, players choose which side (attacker or defender) to participate in and share Units and turns with their teammates. At the start of the round, players roll for initiative with the higher roll, giving the first chance to move a Unit. | |||
=== Unit Deployment === | |||
[[File:Deployment Areas.png|frameless|right|400px|]] | |||
Once the attacker and defender have been determined, it is now time for the players to deploy their squads to the battlefield. Each side has a dedicated Deployment Area laid out in the mission details. Standard Deployment Areas are the first 3 hexes from the short side table edge on both sides. | |||
Starting with the attacker, they will place one Unit within their Deployment Area on any elevation/terrain they see fit. If their Unit flies/swims, they may start in the air/water but must place a token down notating its elevation. Once the attacker's Unit has been deployed, the defender does the same. In an alternating fashion, both players continue to deploy Units until everyone is on the battlefield. | |||
After both sides have deployed their Units, the Deployment Phase has ended and gameplay can begin. | |||
=== Action Points === | |||
At the start of a Unit's activation, before moving, the player must roll 1d8 to determine the number of Action Points (AP) available during that turn. Action Points are spent to perform various actions, such as entering a prone position, deploying a drone, or firing a weapon. | |||
After rolling, the result is added to the Unit’s Base AP value as listed on its Datasheet in the Specifications Section. | |||
A Unit may store unused AP from one turn to the next. However, it cannot exceed a total of 16 AP at any time unless stated otherwise. | |||
=== Phases of a Turn === | |||
The 30MM: Wargame consists of a series of alternating turns that make up a number of rounds. Each turn consists of three phases. The players will execute these phases in sequential order for every Unit that is activated. After a Unit has been activated and completed all three phases, play passes to the next player in the established play order (e.g., Attacker 1, Defender 1, Attacker 2, Defender 2, etc). Once all Units have been activated, progressed through each phase, and become inactive, the round ends and a new one begins. | |||
Each turn includes the following phases, performed in the following order: | |||
# Movement Phase | |||
# Ranged Combat Phase | |||
# Close Combat Phase | |||
=== Movement Phase === | |||
The player may now choose a Unit to activate and begin its Movement Phase. Once selected, the player rolls for Action Points as explained in the section above. | |||
If a player chooses not to activate a Unit or the Unit is unable to act (due to a status effect, lack of AP, or other restriction), the Unit is immediately marked Inactive and play passes to the next Unit in turn order. | |||
After the player has determined the amount of AP the Unit has, they then can move to their desired location. In the Specifications Section of the Datasheet, there is a section called “Standard Movement”. This section shows how many hexes that Unit can move in a single activation. A Unit can move any number of hexes to a maximum of what that section shows. When moving a Unit, its facing is also important, as it affects both offense and defense. Changing Facing also costs a single movement point. Greater details on how facing works can be found in the [[Core Rules#Facings|Facings Section]]. Below the standard movement you’ll also see “Thruster Movement”. This option is only available to Units that meet certain requirements as found in the [[Core Rules#Thruster Movement|Thruster Movement]] Section below. A Unit also has the option of not moving at all. Outside of this basic information there are other steps that can be taken listed in the next section [[Core Rules#Movement|Movement]]. | |||
Any terrain effects gained must be resolved before moving on to the next phase. | |||
=== Ranged Combat Phase === | |||
After moving the selected Unit to the desired hex, the player may then make attacks with ranged weapons. | |||
All attacks made must subtract the weapons AP cost from the Units current stored AP. If the Unit does not have an adequate amount of AP, then the Unit cannot make an attack with that weapon. | |||
If the player decides to not make a ranged attack (to save AP or any other reason they decide), they may skip this phase and move to the next but cannot return to it. | |||
=== | === Declaring Weapons Fire === | ||
The player must then choose a target to attack. Once a target has been established, then the player must declare which Unit Section on that target they are going to attack. | |||
Common Unit Sections include Head, Torso, Left Arm, Right Arm, Left Leg, and Right Leg. | |||
A player must declare all attacks they plan to make at this time, specifying which weapon(s) they intend to fire and at what sections. | |||
Players may not change an attack declaration once made. | |||
=== | === Resolving Weapons Fire === | ||
Once a target and Unit Section are declared, the player will then resolve the weapons fire one weapon at a time. | |||
All declared attacks must be made, even if the intended target is destroyed before all attacks against it have been resolved. | |||
The order in which a Units weapons are rolled and resolved is up to the Units player. | |||
=== | === Close Combat Phase === | ||
[[File:In-Active.png|thumb|right|175px|Activation Tokens are used to manage Unit activations. Place the activation token next to the Unit you wish to activate. | |||
When a Unit completes its activation, flip the token to the Inactive side.]] | |||
Players repeat the steps given for the Ranged Combat Phase except with close combat weaponry (typically weapons with a range of 1). | |||
Once the player has resolved all close combat damage, the Unit becomes inactive and ends its turn. At which point, the opposing player chooses a Unit and begins the cycle again. | |||
=== Win Conditions === | |||
Players repeat the sequence of play given above until one side achieves victory. Under normal circumstances, the side with the last surviving Unit on the battlefield wins. If the last Units from each side are destroyed simultaneously or if the last Units from each side are rendered Inoperable, the game is a draw. Players may set other victory conditions by mutual agreement before play begins. In addition, some missions have special victory conditions of their own. | |||
=== Unequal Units on Map === | |||
When both sides have an equal number of Units, each player takes a turn activating a single Unit, then the other player activates a single Unit, and so on. If the number of units on each side is unequal, this procedure is altered. | |||
If one side has more activatable units than the other, the players will continue to alternate Unit activations until one player can no longer activate their Units for that round. At which point, the other player will continue activating their Units until they are all deactivated and the round is over. | |||
[[File:Top down (1).png|thumb|center|350px|In the image above, follow the sequence (top to bottom) to resolve an attack. | |||
First, the attacking player makes their Attack Roll(s). If the attack succeeds, the defending player then makes their Defense Roll(s). If the defender fails to evade the attack, damage is applied and resolved. | |||
A more in-depth explanation can be found in the Combat section under Combat Roll Resolution.]] | |||
== Movement == | |||
| | During the Movement Phase, Units may reposition and adjust their elevation on the battlefield to secure tactical advantage. | ||
=== Standard Movement === | |||
A Unit’s Standard Movement value is listed in the Specifications Section of its datasheet. This value represents the total number of Movement Points (MP) the Unit may spend during its Movement Phase, determined by its Classification. | |||
A Unit may move into the hex it is currently facing or into the hex directly behind it; movement into any other hex requires a facing adjustment. Entering a clear hex costs 1 MP whether moving forward or backward, while movement costs for other terrain types vary as specified elsewhere in the rules. | |||
=== Standard Jump === | |||
A Mech Unit may perform a Standard Jump as part of their Standard Movement. A Standard Jump allows the Unit to leap over the hex directly in front of it and land two hexes forward while maintaining its facing, at a cost of 2 MP. | |||
The Unit must remain on the same elevation throughout the jump and cannot leap over a hex, structure, or Unit that occupies a higher elevation level. | |||
A Unit may descend to a lower elevation during a jump as long as it has enough MP to complete the movement; otherwise, [[Core Rules#Fall Damage|Fall Damage]] is applied based on the number of elevation levels dropped. | |||
Upon landing, all terrain effects of the landing hex immediately apply. A Unit may perform multiple Standard Jumps during its Movement Phase, provided it has sufficient MP remaining. | |||
<Gallery mode="nolines" widths=350 heights=250 > | |||
File:Move no jump.png|frameless|left|300px|The image on the left shows the side view of Unit A moving across a blue hex to reach the other side. Without jumping, it will cost the Unit 4 movement points to reach the other side. | |||
File:Move jump.png|frameless|left|300px|The Image on the right shows the same side view of Unit A moving across a blue hex to reach the other side. The Standard Jump was used and saved the Unit 2 movement points. | |||
</gallery> | |||
=== Facings === | |||
Each hex on the battlefield has six sides. A Unit must always face one of these sides; this is referred to as its Facing. | |||
Changing a Unit’s Facing costs 1 Movement Point, deducted from its Standard Movement allowance. | |||
[[File:Movement Diagram 2.png|thumb|center|800px|■ The left shows Unit A moving 2 hexes forward, changing its facing direction once, and finally moving a single hex forward before ending its movement. ■ The right shows Unit B making 2 facing changes before moving 2 hexes forward, then making another facing change and a single movement forward before ending its movement.]] | |||
=== Thruster Movement === | |||
When a Unit is equipped with thrusters, it may perform a Thruster Movement instead of a Standard Movement. Thruster Movement allows the Unit to move up to double its standard movement points in a single turn, as indicated by its Thruster Movement value. | |||
Thruster Movement must be performed in a straight line, and the Unit must normally remain on the same elevation from start to finish. | |||
=== Thruster Jump === | |||
As part of Thruster Movement, a Unit may perform a Thruster Jump, allowing it to ascend or descend elevations during its movement. | |||
A Unit initiates a Thruster Jump by declaring Thruster Movement. | |||
When performing a Thruster Jump, the Unit may move in a straight line and change elevations at any point along its movement path, up to its Thruster Movement value. The Unit may land on a hex at a higher or lower elevation than where it began. | |||
If a Unit ends its movement on a hex without solid ground beneath it and does not have the [[Core Rules#Aerial Movement|Aerial [AIR] Movement Mechanism]], it immediately falls to the next available elevation and suffers [[Core Rules#Fall Damage|Fall Damage]]. | |||
==== Additional Rules ==== | |||
* The Unit may move any number of hexes, up to its Thruster Movement value. | |||
* After completing a Thruster Movement, the Unit must maintain its facing direction, forfeit its Combat Phase (unless otherwise stated), and become inactive. | |||
* If all thrusters on the Unit are destroyed, it can no longer perform Thruster Movements. | |||
=== Elevation Changes === | |||
Units may change elevation during the Movement Phase. | |||
Ascending or Descending one elevation level costs 1 Movement Point in addition to the 1 Movement Point to move into the new hex. | |||
Backward Movement: | |||
Units moving backward cannot change elevation. | |||
Unauthorized Elevation Changes: | |||
A Unit cannot force another Unit to ascend to a higher elevation. | |||
A Unit may force another Unit to descend to a lower elevation. Units forced downward suffer Fall Damage (pg. 32). | |||
=== Terrain === | |||
Non-Grey terrain types, those with additional environmental effects, require extra Movement Points to move through. | |||
Certain terrain types may also grant bonuses or impose restrictions on movement and other actions while a Unit occupies them. | |||
Refer to the [[Core Rules#Hex Colors|Hex Colors]] for full details. | |||
=== Hex Occupancy === | |||
A Unit may move through a hex occupied by a friendly Unit. A Unit may not move through a hex occupied by an enemy Unit unless executing a Thruster Impact. | |||
A Unit may end its Movement Phase in a hex containing friendly Units, provided that each Unit maintains at least 80% of its model within the hex, based on best judgment, and the Units do not physically overlap. | |||
Units may be repositioned freely within the hex as long as at least 80% of the model remains inside the hex (this does not require a Command Action to perform) and the Unit maintains the facing established at the end of its movement. | |||
Movement within the hex may be used to set up ambushes, establish firing positions, or improve cover. | |||
Opposing Units cannot occupy the same hex unless otherwise specified or unless they are positioned on different elevation levels. | |||
=== Movement Mechanisms === | |||
A Unit’s method of traversing the battlefield is defined by its Movement Mechanism. These dictate how a Unit interacts with terrain, elevation, and movement-related effects. A Unit’s assigned mechanism is determined by the components used during its construction and is listed on the Unit’s datasheet as a three-letter tag. Units that are considered Mechs do not qualify for any Vehicle additional rules. | |||
Tags appear as 3 letters within brackets and allows players to quickly identify how a rule or item functions. For a full explanation, see [[Core Rules#Tags|Tags]]. | |||
There are three types of Movement Mechanisms. | |||
==== Terrestrial Movement ==== | |||
Tag: [TRS] | |||
The standard movement mechanism for all ground-based Units. These Units traverse solid terrain using walking, rolling, or similar locomotion. | |||
This mechanism does not require Thruster Durability unless it is performing a Thruster Movement. | |||
Units with this mechanism must use elevated terrain to move to higher elevations. A Terrestrial Unit cannot move directly to a higher elevation unless there is accessible terrain. | |||
To qualify for this mechanism, a Unit must have at least one of the following Unit Sections: Legs, Treads, Wheels, or comparable locomotion systems. | |||
===== Terrestrial Vehicles ===== | |||
Land-based vehicle Units follow additional rules to reflect their unique combat and movement traits. | |||
Requirements: | |||
* Must contain at least one [TRS] marked Unit Section. | |||
* Must not contain an [AQN] or [AIR] tag. | |||
Restrictions: | |||
* Weapon range is halved when firing through green hexes. | |||
* Movement costs 2x when crossing green hexes. | |||
Bonuses: | |||
* Field of View (pg. 18), the area the Unit can target Units, is all 6 hexes around the Unit. | |||
* Main Cannon has an AP reduction of 3 (to a minimum of 4). | |||
==== Aquatic Movement ==== | |||
Tag: [AQN] | |||
The standard movement mechanism for all water based Units. These Units traverse and maneuver through aquatic terrain such as oceans, rivers, and lakes, freely adjusting their position within submerged environments. | |||
Units with the [AQN] Movement Mechanism use Movement Points (MP) as normal Standard Movement to navigate Blue Hexes with two exceptions: ascending upward in the water costs 1 MP, while descending to a lower elevation costs no additional MP. | |||
To qualify for this mechanism, a Unit must have at least one of the following: Fins, Thrusters, or comparable propulsion sections. A Unit must also meet or exceed the required Thruster Durability threshold to maintain this mechanism. | |||
If a Unit’s Thruster Durability drops below the required threshold, it immediately loses access to [AQN] movement and becomes subject to Blue Hex terrain effects. | |||
===== Aquatic Vehicles ===== | |||
Water-based vehicle Units follow additional rules to reflect their unique combat and movement traits. | |||
Requirements: | |||
* Must contain at least one [AQN] marked Unit Section. | |||
* Must not contain an [TRS] or [AIR] tag. | |||
Restrictions: | |||
* Cannot make normal movements on 0 Elevation (Ground Level). | |||
* Can only move over light/dark blue hexes; failure to do so results in the Unit gaining the Grounded status effect. | |||
Bonuses: | |||
* Attacks made with missile pods do not require LoS. | |||
==== Aerial Movement ==== | |||
Tag: [AIR] | |||
The standard movement mechanism for all air based Units. These Units operate above the battlefield, maintaining altitude without reliance on solid ground and freely traversing terrain by air. | |||
Units with the [AIR] Movement Mechanism use Movement Points (MP) to travel between hexes as normal Standard Movement to navigate, but they ignore all ground-based terrain effects unless specified to effect them. These Units can also adjust their elevation up or down by 1 level at the cost of a single MP rather than the standard 2. | |||
Units with this mechanism cannot fly through Green Hexes (dense vegetation or forest terrain). | |||
If a Unit loses access to [AIR] while airborne and without solid ground beneath it, it immediately falls to the lowest available elevation and suffers fall damage as normal. See the Minimum Thruster Durability chart on the next page for more information. | |||
To qualify for this mechanism, a Unit must have at least one of the following: Wings, Rotors, Thrusters, or comparable propulsion systems. A Unit must also meet or exceed the required Thruster Durability threshold to maintain this mechanism. | |||
===== Aerial Vehicles ===== | |||
[[File:Thruster durability1.png|thumb|350px|The chart above shows the minimum Thruster Durability required for each classification to access a Movement Mechanism. | |||
Note: When creating a Custom Unit, it is recommended to keep the Thruster Durability well above the listed threshold. If the durability falls below it loses the mechanism. ]] | |||
Air-based vehicle Units follow additional rules to reflect their unique combat and movement traits. | |||
Requirements: | |||
* Must contain at least one [AIR] marked Unit Section. | |||
* Must not contain an [AQN] or [TRS] tag. | |||
Restrictions: | |||
* Cannot make normal movements on 0 Elevation (Ground Level). | |||
* Cannot move backwards. | |||
* Must use all movement points (standard or thruster) during activation; failure to do so results in the Unit gaining the Grounded status effect. | |||
Bonuses: | |||
* Strafing Runs: When the Unit passes directly over enemy Units (at one elevation higher) during the Movement Phase, it may pause movement to conduct a single ranged or close combat attack. After resolving the attack, the Unit continues it movement. This can be repeated multiple times during a single movement phase until the Activated Unit's AP is 0 or no more targets are within the movement path. | |||
== Combat == | |||
Once the player’s chosen Unit completes the Movement Phase, they engage in combat. Units use two forms of combat: Ranged Combat and Close Combat. Ranged Combat utilizes missiles, beam rifles, rockets, and many others. Close combat utilizes beam swords, pile bunkers, heavy metal swords, and even other Units. | |||
=== Targeting Basics === | |||
This section establishes how a Unit selects and validates a target before making an attack. | |||
==== Defining a Target ==== | |||
All targets fall into one of two categories: Units or Structures. | |||
* Units include mechs, vehicles, drones, and any weapons or equipment integrated with them. | |||
* Structures refer to any constructed object of human origin, including buildings, fortifications, or installations. | |||
A player cannot deliberately target an allied Unit. | |||
==== Field of View ==== | |||
If an attacking Unit has Line of Sight to its intended target, the player must then check whether the target is within the Unit’s Field of View (FoV). | |||
A Unit’s FoV begins with the hex directly in front of it and includes the adjacent hexes to its immediate left and right, forming a forward-facing arc. This arc expands outward in a cone-shaped pattern from the attacker to the edge of the battlefield. | |||
< | <Gallery mode="nolines" widths=350 heights=250 > | ||
File:FoV TOP.png|frameless|left|300px| | |||
File:FoV SIDE.png|frameless|left|300px| | |||
</gallery> | |||
| | |||
| | |||
| | |||
| | |||
| | |||
| | |||
| | |||
| | |||
< | |||
==== Line of Sight ==== | |||
[[File:LoS.png|thumb|right|325px|In the image above, Unit A (Blue) stands before Units B–F (Red) to illustrate various Line of Sight (LoS) scenarios. | |||
■ Unit A to B: Clear LoS. | |||
■ Unit A to C: Two green hexes intervene LoS. | |||
■ Unit A to D: No LoS due to intervening elevation. | |||
■ Unit A to E: Clear LoS. | |||
■ Unit A to F: No LoS due to intervening elevation.]] | |||
Line of Sight (LoS) is used to determine visibility between an attacking Unit and its designated target. | |||
To determine LoS, the player must use the actual line of sight from the physical model. This is done by lowering their perspective to the eye level of the Unit’s cockpit or sensor array (head) and verifying whether the targeted Unit Section is visible. If any part of the target section is visible, LoS is established. | |||
LoS may be obstructed by terrain, structures, or other Units, friendly or hostile. | |||
Terrain between the attacker and target may partially or fully obstruct LoS. If an attack passes through terrain with visibility modifiers (e.g., forests or debris), apply the listed penalties under Terrain Effects. | |||
When declaring an attack, the player must also ensure that the weapon system being used has an unobstructed LoS to the target. This is verified by physically aiming the weapon at the intended target. The line from the weapon to the target must be free of any obstructions, including terrain features, structures, or other Units. | |||
==== Targeting Conditions ==== | |||
This section establishes how terrain, elevation, and other Units may obstruct or alter attacks, covering rules for partial obstruction, height differences, terrain effects, and intervening obstacles. | |||
==== Partial Obstructions ==== | |||
In certain situations, a Unit may be partially obscured by terrain, structures, or other Units. Only the visible Unit Sections may be declared as valid targets for attacks. | |||
[[File:Core Section Targets smol.png|thumb|left|500px|The image above shows two Units with different Unit Sections not obstructed by the buildings. | |||
Left: Head, Torso, Left Leg, and Left Arm. | |||
| | Right: Head, Torso, Left Arm, and Right Arm.]] | ||
| | |||
| | |||
| | |||
| Line 394: | Line 412: | ||
==== | ==== Terrain Elevations ==== | ||
Each hex will have its elevation marked on the map. If no elevation marking is present, the hex is treated as Ground Level (Elevation 0) by default. | |||
Hexes with elevations above 0 represent hills or elevated terrain. Hexes with elevations below 0 represent depressions or valleys. | |||
* Water: Water hexes descend to a depth of Elevation -1 to -2 below ground level, with Elevation -2 representing maximum depth. The lower the elevation level, the deeper the water. A Unit occupying a Water hex is always considered to be at the lowest elevation of that hex. | |||
* Forest: Forest hexes share the same elevation as the terrain they occupy. For example, a forest located on Ground Level (0) is also considered to be at Elevation 0. Units occupying Forest hexes are positioned on the base terrain elevation—not atop the treetops. | |||
==== Unit Height & Width ==== | |||
Standard Mechs, Vehicles, and Drones positioned at ground level (Elevation 0) occupy less than one full elevation in height. | |||
An exception is made if a Unit’s waist section (where the legs and torso connect) extends into Elevation +1. In such cases, the Unit’s base elevation is considered +1. | |||
Units are considered to be at the elevation of the hex they currently occupy when calculating LoS. | |||
Most Units occupy less than one full hex in width. Large Units must also remain within a single hex but are permitted to extend up to 80% of their model beyond the hex boundary, provided their base remains clearly and visibly within the hex. | |||
=== Weapon & Attack Requirements === | |||
Defines the conditions a Unit must meet to declare an attack, including weapon availability, range, line of sight, and any special restrictions. | |||
==== Weapon Requirements ==== | |||
Before declaring an attack, the player must confirm that the Unit can use the weapons in its inventory by meeting the following conditions: | |||
* AP Cost: Each weapon has a designated Action Point (AP) cost. This is the number of AP required to perform a single attack. | |||
* Range: All weapons have a listed range value. The intended target must be within this range. | |||
* Equipped Weapons Only: A Unit may only attack with weapons that are currently equipped—either mounted or held in-hand. | |||
==== Attack Declaration ==== | |||
Once a target has been confirmed within the attacking Unit’s Field of View (FoV), the player must declare an attack. When declaring an attack, the player must state the following (in any order): | |||
* The weapon or weapons being used. | |||
* The target Unit, including the specific Unit Section or Sections being aimed at. | |||
After the attack is declared, the total Action Point (AP) cost of all chosen weapons is subtracted from the Unit’s available AP. | |||
Example: Unit A uses its beam saber to attack 3 times. The beam saber’s AP cost is 5, a total of 15 AP will be subtracted. | |||
=== Combat Roll Resolution === | |||
This section explains how players resolve combat by making Accuracy, Assault, and Evasion rolls, including the effects of Critical Hits and Misses. | |||
==== Attack Rolls ==== | |||
An Attack Roll is a dice roll made by the attacking player to determine whether their Ranged or Close Combat attack is On Target. | |||
On Target simply means the attack that was made has successfully targeted the intended area. | |||
Once all Attack Rolls have been made, the targeted Unit’s player will then make their rolls. | |||
===== Accuracy ===== | |||
Also known as rolling for accuracy, is the process used to determine whether a ranged attack is On Target. | |||
To perform an Attack Roll, the attacking player rolls one d8 for each declared attack. The result of each roll is then compared to the Unit's Accuracy Stat: | |||
* If the roll is equal to or higher than the Unit’s Accuracy Stat, the attack is considered On Target. | |||
* If the roll is lower, the attack misses completely. | |||
===== Assault ===== | |||
Also known as rolling for assault, is the process used to determine whether a close ranged attack is On Target. | |||
Similar to accuracy rolls, the attacking player rolls one d8 for each declared attack. The result of each roll is then compared to the Units Assault Stat: | |||
* If the roll is equal to or higher than the Unit’s Assault Stat, the attack is considered On Target. | |||
* If the roll is lower, the attack misses completely. | |||
==== Defense Rolls ==== | |||
A Defense Roll is made by the defending player to determine whether incoming On Target attacks successfully hit their Unit. | |||
After all Defense Rolls have been resolved, any attacks that successfully hit the Unit must be applied and damage calculated. | |||
===== Evasion ===== | |||
Also known as rolling for evasion, this process determines whether On Target attacks actually hit the defending Unit. | |||
To perform an Evasion Roll, the defending player rolls a d8 for each On Target attack made by the attacker. Each result is then compared to the defending Unit’s Evasion stat: | |||
* If the roll is equal to or higher than the Evasion stat, the attack is successfully evaded and no damage is taken. | |||
* If the roll is lower, the evasion fails and the Unit takes damage to the targeted Section. | |||
: | ==== Critical Rolls ==== | ||
When making Attack or Defense Rolls, there are two types of Critical Rolls: Critical Hits and Critical Misses. | |||
* Critical Hit: Occurs when the die result is an 8. The attack cannot be evaded and deals 1.5× the weapon’s Base Damage (round up). | |||
* Critical Miss: Occurs when the die result is a 1. The attack automatically misses. | |||
=== Damage & Effects === | |||
During combat, weapons deal a set amount of damage known as Base Damage. This value can be found in the Base Damage column of the Unit’s Datasheet. Base Damage represents the standard amount of damage a weapon inflicts before other effects are applied. This amount is dealt for each successful hit on a target. | |||
==== Resolving Damage ==== | |||
When an attack is successful, the damage is applied to the Unit Section chosen by the attacker. The defending player reduces that section’s Defense Points (DP) by the weapon’s Base Damage value. This happens during the attacking players turn and must be resolved before the turn ends. | |||
If the DP of that section is reduced to zero, that section is destroyed. When a Unit Section is destroyed, it becomes non-operational and can no longer be targeted. All weapons, equipment, and special abilities located in that section are also destroyed and removed from play. | |||
: | ==== Resolution Order ==== | ||
All attacks are resolved in the order they occur. When resolving multiple hits on a single Unit from the same weapon, all hits are rolled and resolved simultaneously. When resolving hits made with different weapons, resolve all rolls and resulting damage from one weapon before proceeding to the next. | |||
Example: Unit A successfully hits Unit B’s torso with three beam rifle shots, dealing a total of 15 damage. This value is then subtracted from the torso’s Defense Points. Unit A then hits Unit B’s torso again with two rocket shots, dealing a total of 20 damage. This value is also subtracted from the torso’s Defense Points. | |||
Destroyed Unit Sections | |||
When a Unit Section is destroyed, the player may remove the corresponding piece from the model or place a Destroyed Limb token to mark it. In either case, the associated Status Effect is immediately applied: | |||
==== Destroyed Vs. Inoperable ==== | |||
A Unit is considered Destroyed when its Torso (for Mechs) or Cockpit (for Vehicles) | |||
Durability Points are reduced to 0. When a Unit is destroyed, leave its model on the battlefield, placed face down. If the hex it occupies does not already contain a terrain effect, that hex becomes a Black Hex. | |||
A Unit is considered Inoperative when its core section remains intact but it can no longer function effectively: | |||
* Mechs: If the Torso Unit Section is intact but all limbs are destroyed, the Unit is Inoperative. | |||
* Vehicles: If the Cockpit Unit Section is intact but the Unit loses all mobility sections, it is Inoperative. | |||
An Inoperative Unit may still participate in an engagement if it has functional Drones, Mounted Weapons, or Handheld Weapons. | |||
{| class="wikitable" style=" | ==== Status Effects ==== | ||
|- | Status Effects represent ongoing conditions that change how a Unit behaves in combat. They can come from abilities, weapons, or terrain features. | ||
{| class="wikitable" style="margin:auto" | |||
|- | |||
|- | ! Name !! Effect | ||
| | |- | ||
| | |Abyssal || | ||
|- | * Standard Movement is limited to 2 Movement Points. | ||
| | * At the start of its turn, the Unit suffers 10 damage to its Torso Unit Section. | ||
| | |- | ||
|- | |Airborne || | ||
| | * If a Unit has the [AIR] Movement Mechanism, place an elevation token (+1, +2, +3) beside it to indicate its current elevation. This token is removed when the Unit returns to solid ground. | ||
| | |- | ||
|- | |Blinded || | ||
| | * Unit gains -1 to Accuracy and Assault Rolls. | ||
| | * Reduces non-melee weapon ranges by 50% (rounding up). | ||
|- | |- | ||
| | |Conceal || | ||
| | * Unit gains +1 to Evasion Rolls against Long Ranged Attacks. | ||
|- | |||
|Crippled (Partial) || | |||
* Standard Movement is reduced by 50% (rounding up). | |||
* Unit gains -1 to Assault Rolls. | |||
|- | |||
|Crippled (Severe) || | |||
* Standard Movement is limited to 1 Movement Point. | |||
* Unit gains -2 to Assault Rolls. | |||
|- | |||
|Destroyed Limb || | |||
* Unit cannot use weapons or equipment with the destroyed Unit Section. | |||
* Any handheld weapons are dropped onto the battlefield in the Unit’s hex. | |||
|- | |||
|Euphotic || | |||
* Standard Movement is limited to 2 Movement Points. | |||
|- | |||
|Grounded || | |||
* The Unit is considered to be at 0 Elevation (Ground Level). | |||
* Cannot perform Evasions or forward movements (unless otherwise stated). | |||
|- | |||
|Hold || | |||
* Unit cannot make any attacks or movements. | |||
|- | |||
|Ice Buildup || | |||
* For each Ice Buildup token attached to a Unit, reduce its Standard Movement Points by 1 and its total AP storage by 4. | |||
* Upon reaching 3 stacks of Ice Buildup, Unit gains System Error status effect. | |||
* Ice buildup represents water freezing and shorting a Units electronics. This effect remains until the tokens are removed. | |||
|- | |||
|Immobilized || | |||
* Unit cannot perform a movement until condition is removed. | |||
* Cannot Evade. | |||
|- | |||
|Limbless || | |||
* Unit cannot perform grapples, use handheld weapons/equipment, or interact with objects that require arms. | |||
* Break Grapple Command Action costs 4AP. | |||
* Any handheld weapons are dropped onto the battlefield in the Unit’s hex. | |||
|- | |||
|Sand Buildup || | |||
* For each Sand Buildup Token attached to a Unit, reduce its Standard Movement Points by 1 and apply a –1 modifier to all attack and defense rolls made by that Unit. | |||
* Upon reaching 3 Stacks of Sand Buildup, Unit gains System Error status effect. | |||
* Sand Buildup represents sand and dust clogging a Unit’s joints and systems. This effect remains until the tokens are removed. | |||
|- | |||
|Static Buildup || | |||
* Upon reaching 6 stacks, Unit gains System Error status effect. | |||
|- | |||
|Submerged || | |||
* If a Unit has the [AQN] Movement Mechanism, place an elevation token (-1 or -2) beside it to indicate its current elevation on blue hexes. This token is removed when the Unit returns to solid ground. | |||
|- | |||
|System Error || | |||
* Unit ends its turn immediately and removes all buildup effects. | |||
|} | |} | ||
==== Close Quarters Combat ==== | |||
This sections outlines the rules for direct, physical engagements between Units at close range. | |||
===== Basic Attacks ===== | |||
A Unit can make basic attacks during its Close Combat Phase, only if no weapons are equipped. Basic attacks represent using the Units body (punches, kicks, strikes, etc.) to deal minimal damage. All Units can make these attacks and does not need to be on the Units Datasheet. | |||
These do not gain bonuses from Systems, Mods, or Traits unless otherwise stated. | |||
* Cost: 1 AP | |||
* Range: 1 | |||
* Damage: 1 Base Damage | |||
===== Grappling ===== | |||
Grappling occurs when a Unit physically seizes another. Only Units with manipulators (at least 1) can perform a Grapple, and it can only be initiated during the Close Combat Phase. | |||
To perform a Grapple, follow the chart below: | |||
# Engage Grapple | |||
#* Attacker pays 2 AP. | |||
#* Attacker rolls for Assault. | |||
# Grapple Check | |||
#* Success > Go to Step 3. | |||
#* Fail > Grapple Ends (player may go back to step 1). | |||
# Grapple Options (Attacker chooses one) | |||
#* Throw > Go to Throw. | |||
#* Hold > Go to Hold. | |||
# Collision Damage | |||
#* Formula: 2 x (Defender Class x Throw Distance) | |||
#* Special Cases: | |||
#** Structure Intact | |||
#** Structure Destroyed | |||
'''Throw''' | |||
A Unit physically throws another Unit a set distance. Max Throw Distance (in hexes): | |||
(Attacker Class – Defender Class) + 2 | |||
A Unit cannot throw a Unit that has a classification higher than its own. | |||
Landing Outcomes (choose based on destination): | |||
* Into a Structure: | |||
* | ** Defender is placed into the Structures hex (not on the structure), FoV facing the Attacker. | ||
** Apply collision damage to the Defenders Torso Unit Section and the Structure. | |||
* Into a Hex: | |||
** Defender lands supine, FoV facing the Attacker. | |||
** Apply collision damage to the Defenders Torso Unit Section.* | |||
* Into a Hex with other Unit(s): | |||
** Each Unit in the hex must make an Evasion Roll. | |||
** Failure: Apply collision damage to the Unit(s) Torso Unit Section. | |||
** Success: Move into any adjacent open hex within their FoV, facing any direction. | |||
** If no hex is available, the Unit(s) instead applies collision damage to their Torso Unit Section. | |||
** Defender also lands supine, FoV facing the Attacker, and applies collision damage to the Torso Unit Section. | |||
* Blue Hexes: | |||
** Units thrown into a blue hex take half collision damage (rounding up). | |||
'''Hold''' | |||
A Hold represents one Unit grappling and locking down another in close combat, restricting its ability to act. | |||
* Initiating a Hold: | |||
** Move the Attacking Unit into the same hex as the Defending Unit. | |||
** The Defending Unit immediately gains the Immobilized status effect. | |||
* Breaking a Hold: | |||
** The Defending Unit must use the [Break Contact] Command Action to escape. | |||
* Restrictions: | |||
** While holding, the Attacker cannot move but may still attack using mounted weapons or any handheld weapon without the [2H] tag. | |||
'''Structure: Intact''' | |||
If a thrown Unit collides with a structure and the damage deal does not exceed the structures current defense: | |||
* The Unit gains the Immobilized status effect. | |||
* | '''Structure: Destroyed''' | ||
* | If a thrown Unit collides with a structure and the damage dealt exceeds the structures current defense: | ||
* | * The Structure collapses onto the Unit. | ||
* Apply the Structures defense value as bonus damage to the Torso Unit Section. | |||
* Remove the destroyed structure and replace it with a Black Hex. | |||
* Place the Defending Unit supine, with its FoV facing the Attacker. | |||
* On the Defenders next activation, it must use the [Recover] Command Action to stand. If it does not, the Unit remains supine. | |||
Example: Unit A grapples Unit B, spends 2 AP, and succeeds on an Assault Roll. With a higher Classification (4 vs 3), Unit A throws Unit B 3 hexes (4-3)+2. Unit B lands 2 hexes away, supine and facing Unit A, and suffers 12 Torso damage (3x2)x2 from the collision. | |||
=== | ===== Thruster Impact ===== | ||
A Thruster Impact occurs when a Unit uses thrusters to rapidly advance and collide with an enemy Unit, causing damage and displacement. | |||
| | |||
When a Unit conducts a Thruster Movement and an enemy lies within its movement path, the Thruster Movement becomes a Thruster Impact. | |||
Thruster Impacts can also be performed in the air or in the water. | |||
Range Requirements: | |||
* Target must be beyond the Units Standard Movement Range. | |||
* Target must be within the Units Thruster Movement Range. | |||
AP Cost: | |||
The attacking Unit pays 2 AP + 1AP per 2 hexes traveled (rounding up). | |||
Resolution: | |||
# Confirm the target is within range and select the endpoint hex. | |||
# Spend the AP cost. | |||
# The attacking Unit makes an Assault Roll: | |||
#* Failure: The Unit moves to the closest hex in its path toward the target and ends its turn. | |||
#* Success: The defending Unit chooses one of the following responses: | |||
[[File:Initial.png|none|left|400px|]] | |||
Evade | |||
* Defender makes an Evasion Roll. | |||
** Success: Move to any open hex within current FoV and out of the attackers path, facing the same direction. Flying Unit may move one elevation higher. | |||
** Failure or no available hexes: Attacker slams the defender one hex past the endpoint. Damage is applied to the defenders Torso/Cockpit Unit Section. | |||
** Attacker continues to the designated endpoint and ends its turn. | |||
[[File:Evade.png|none|left|400px|]] | |||
Stand Firm | |||
* Defender makes an Assault Roll. | |||
** Success: The defender blocks the charge (see Class Difference) and damage is applied to the attacking Units Torso Unit Section. The attacker stops in the adjacent hex. | |||
** Failure: Attacker slams the defender one hex past the endpoint. Damage is applied to the defenders Torso/Cockpit Unit Section. | |||
* Class Difference: If the defender’s Class is higher than the attacker’s, the charge is stopped completely. If the defender’s Class is equal to or lower, the charge continues as normal and both Units take damage. | |||
[[File:Stand Firm.png|none|left|400px|]] | |||
Damage: | |||
Thruster Impact damage is determined by the Attacking Units class (see below). | |||
[[File:Thruster Impact damage.png|frameless|right|350px|]] | |||
'''Other Situations''' | |||
While engaging in a Thruster Impact, the attacking Unit may run into various situations. | |||
Slamming Unit into Elevated Terrain: | |||
If a Thruster Impact attempts to move a target into a hex with elevated terrain, the target does not enter that hex. Instead, it takes 2x normal Thruster Impact damage to its Torso/Cockpit Unit Section. The attacker ends movement in the adjacent hex. | |||
If the targeted Unit successfully evades the incoming attack, the attacking Unit instead collides with the elevated terrain, takes the full damage from the impact, and ends its turn in a hex adjacent to that terrain. | |||
Slamming Unit into Multiple Units: | |||
If a Thruster Impact attempts to move multiple targets, the action cannot be completed. | |||
== Other Actions == | |||
This section covers special actions and mechanics outside of standard movement and combat. These include Command Actions that allow Units to alter their behavior, Systems, Mods, and Traits that provide unique abilities or upgrades, and rules for handling falling and fall damage during play. | |||
Command Actions | |||
Command Actions are special actions a Unit can perform during its turn that are not tied to any specific phase. Each Command Action costs 2 Action Points (AP) and may be used multiple times in a single turn unless otherwise stated. | |||
Command Actions are divided into three categories: | |||
* State: Effects that resolve instantly when used and do not remain active.. | |||
* Stance: Actions that may be taken out of turn. Activating a Stance immediately ends the Unit’s current turn. | |||
* Order: Commands issued to Drone Units, allowing them to act under the Main Unit’s direction. | |||
{| class="wikitable" style="margin:auto" | |||
|- | |- | ||
| | !Name !!Category !!Description | ||
| | |- | ||
| | |Recover | ||
||State | |||
||A Unit returns to a standing position from knocked down state. | |||
If the Unit is knocked prone or laying on the ground, return to its standing position. | |||
|- | |- | ||
| | | Press On | ||
| | ||State | ||
| | ||The pilot pushes the Unit beyond safe limits, refusing to yield ground. | ||
Unit gains an additional Standard Movement Point. | |||
|- | |||
|Break Grapple | |||
||State | |||
||With a surge of strength, the Unit tears free from its opponent’s hold. | |||
Perform an Assault Roll: If successful, the Unit breaks free. If unsuccessful, no change. | |||
|- | |||
|Exchange | |||
||State | |||
||The Unit swiftly switches its weapon loadout to adapt to the changing battle. | |||
Allows a Unit to replace an equipped Weapon with one being carried. | |||
|- | |||
|Retrieve | |||
||State | |||
||A mechanical arm or manipulator reaches out to reclaim a dropped item. | |||
A Unit with a free hand may pick up a dropped or disarmed allied weapon from the same hex and equip it. | |||
|- | |- | ||
| | |Release | ||
| | ||State | ||
| | ||The Unit disregards a weapon or equipment to lighten its load. | ||
A Unit may drop a Weapon or Equipment from one of its hands onto its current hex. | |||
|- | |- | ||
| | |Transform | ||
| | ||State | ||
| | ||Armor shifts, joints realign, and the Unit reconfigures into its alternate form. | ||
Unit shifts into its Alternate Form, gaining bonuses from that form. Weapons with the [GB] tag may also Transform. Use again to revert. | |||
|- | |- | ||
| | |Purge Buildup | ||
| | ||State | ||
| | ||The Unit vents pressure and heat, clearing away harmful environmental effects. | ||
Roll a single D8 die. On a 5+, remove one stack of a buildup status effect. On a 4-, no change. | |||
|- | |- | ||
| | |Kneeling Position | ||
| | ||State | ||
| | ||The Unit braces itself, lowering its stance for improved stability and accuracy. | ||
Mech Units ONLY | |||
Unit kneels, gaining +1 Accuracy Rolls but cannot Evade. May be used once per turn. Unit must use Recover to stand. | |||
|- | |- | ||
| | |Prone Position | ||
| | ||State | ||
| | ||The Unit drops flat against the ground, becoming a low, steady firing platform. | ||
Mech Units ONLY. | |||
Unit gets into a prone position, gaining +3 to Accuracy Rolls but cannot Evade. Must kneel before getting into or out of the prone position. Cannot enter the prone position if its facing direction is obstructed by a Structure or another Unit. | |||
|- | |- | ||
| | |Takeoff | ||
| | ||State | ||
| | ||Engines roar to life as the Unit propels itself back into the sky or ocean. | ||
The Unit moves 3 hexes straight and changes Elevation by 1 to regain Airborne or Submerged status. The Unit cannot Evade during this activation. If any hex in its path imposes a movement penalty, the Unit still moves forward but remains Grounded. | |||
|- | |- | ||
| | |Offensive Stance | ||
| | ||Stance | ||
| | ||The Unit prepares to attack any enemy entering its Field of View (FoV) and weapon range. | ||
Mech Units only | |||
Enter Offensive Stance by choosing a ranged weapon, reserving its AP cost, and selecting a direction to focus the Unit’s Line of Sight. The reserved AP cannot be used for other actions. | |||
If an enemy Unit crosses this Line of Sight while within the weapon’s range, the Unit immediately makes an Attack with that weapon, interrupting the enemy’s movement. The first Unit to do so becomes the target. | |||
A Unit crosses the Line of Sight when its movement path passes across the focused line extending from the Unit. | |||
The stance ends if: | |||
* The Unit makes the Attack (reserved AP is spent). | |||
* The Unit is successfully hit (reserved AP is lost). | |||
* The Unit’s next activation begins (reserved AP is returned). | |||
While in this stance, the Unit cannot Evade. | |||
|- | |- | ||
| | |Defensive Stance | ||
| | ||Stance | ||
| | ||The Unit braces using a Shield or Two-Handed Weapon, redirecting all incoming damage from its front arc to that item. | ||
Mech Units only | |||
When a Unit enters Defensive Stance, choose one equipped Shield or Weapon. All incoming damage to the Unit is redirected to the chosen item instead. | |||
While in this stance, the Unit cannot change facing or Evade. | |||
The stance ends immediately if the chosen Shield or Weapon is destroyed, or at the start of the Unit’s next activation. | |||
|- | |- | ||
| | |Parry Stance | ||
| | ||Stance | ||
||The Unit enters a guarded combat posture, prepared to deflect incoming melee strikes. | |||
Mech Units only | |||
While in Parry Stance, the Unit may parry one successful melee attack against it, negating all damage from that attack. The Unit must have at least one Arm Unit Section to perform a parry. | |||
The stance ends after the parry is made or at the start of the Unit’s next activation. | |||
|- | |- | ||
| | |Deploy | ||
| | ||Order | ||
||The drone launches from its bay, entering the battlefield to extend the Unit’s reach. | |||
Place 1 attached AI or Non-AI Drone on a hex within 2 hex radius of the Main Unit facing any direction. | |||
|- | |- | ||
| | |Guidance | ||
| | ||Order | ||
||The Unit feeds targeting data to its drone, directing it to assist with precision strikes. | |||
Activate a linked AI Drone. Once the AI Drone becomes Inactive, the Main Unit continues its activation. | |||
|- | |- | ||
| | |Recall | ||
| | ||Order | ||
||The drone disengages and returns to the Unit, awaiting further commands. | |||
Remove 1 AI or Non-AI Drone from a hex within 2 hex radius of the Main Unit and attach it to the Main Unit. | |||
|- | |- | ||
| | |Reposition | ||
| | ||Order | ||
||The drone shifts its position across the battlefield to gain a tactical advantage. | |||
Move 1 hex in any direction but it must remain within 2 hexes of the Main Unit. | |||
|} | |} | ||
[ | === Transforming === | ||
Some Units are capable of shifting from a Base Form to an Alternate Form. Transforming represents a Unit changing its physical structure and mode of operation to gain new abilities and restrictions. | |||
When a Unit transforms, its stats, movement, and abilities switch to the Alternate Form, while any existing damage or status effects are retained. A Unit may only transform once per activation. | |||
Transforming Units use a Datasheet marked with a “T” in the bottom right corner. On the datasheet, a Unit’s Base Form stats are marked with a single arrow, while its Alternate Form stats are marked with a diverging arrow. | |||
A transforming Unit’s Base Form is always a Mech-type, and its Alternate Form is always a Vehicle-type. The [Transform] Command Action allows the Unit to switch between these forms. | |||
While in its Alternate Form, the Unit gains all bonuses and restrictions associated with that Movement Mechanism | |||
=== Falling & Fall Damage === | |||
A Unit falls when it is thrown, pushed, or otherwise forced from its position into a hex below its current elevation. | |||
Fall Damage formula: | |||
2 x (Unit Class x Elevation Height) | |||
When a Unit falls: | |||
# Distance – Measure the number of Elevation Levels the Unit descends before reaching a valid impact area. | |||
# Impact – Upon impact, the Unit takes Fall Damage to its Torso or Cockpit Unit Section. | |||
Special Rule: | |||
* Landing in a Blue Hex reduces fall damage by half (rounded up). | |||
''Example: Unit A is a Class 4 mech flying above the battlefield at the +3 elevation. It takes enough damage from Unit B to lose the [AIR] movement mechanism. Unit A immediately falls to Ground Level and suffers [2x(4x3)] 24 Torso damage.'' | |||
=== Drone Operations === | |||
Drone Operations outlines how drones with Artificial Intelligence, and without, function on the battlefield. This section explains what they are, their control requirements, activation timing, and interaction with their assigned Main Units. | |||
==== A.I. Drones ==== | |||
AI Drones are autonomous Units controlled by artificial intelligence. Each AI Drone is considered its own Unit and therefore has its own Datasheet. The pilot assigned to an AI Drone must be an AI, selected during Rank/AI selection. | |||
AI Drones cannot be deployed independently and must be deployed with its Main Unit, a Mech or Vehicle Unit with a Human Pilot to which the Drone is linked. | |||
To control an AI Drone, a few requirements need to be met by both the Main Unit and the AI Unit. | |||
Main Unit: | |||
* Must have the Drone Management Mod. | |||
AI Drone Unit: | |||
* Must have the Drone Agent Mod. | |||
* Its deployment cost must not exceed the deployment cost of the Main Unit its linked to. | |||
During gameplay, an AI Drone may be activated during its Main Unit’s activation via the [Guidance] Command Action. Once activated, the AI Drone functions as a normal Unit, following standard activation and combat rules. | |||
If the AI Drone is not activated during its Main Unit’s activation, it may instead activate normally on its own turn. | |||
==== Non A.I. Drones ==== | |||
Non-AI Drones are small, remotely controlled auxiliary weapons that operate under the direct control of a Main Unit. These drones serve as extensions of the Main Unit’s offensive or defensive capabilities rather than functioning as independent Units. | |||
Non-AI Drones are listed on the Main Unit’s Datasheet under the Weapons and Equipment Inventory module like any other weapon or equipment. However, they gain the [DR] tag in addition to the tag representing their Movement Mechanism: [TRS], [AIR], or [AQN]. The [DR] tag identifies the weapon or equipment as a Non-AI Drone and allows it to act as such. | |||
To field Non-AI Drones, the Main Unit must have the Drone Management Mod equipped, and each Drone must be physically attached to the Main Unit at deployment. A Unit may have no more than 3 Non-AI Drones deployed on the battlefield at one time, regardless of how many it has equipped unless stated otherwise. | |||
After deployment, Non-AI Drones can be released using the [Deploy] Command Action (one Drone per CA) and placed anywhere within a 2-Hex radius of the Main Unit, facing any direction. Once deployed, drones move in tandem with the Main Unit but maintain their initial facing regardless of the Main Unit’s orientation. They also follow standard Hex Occupancy rules. | |||
Individual Drones may be repositioned after deployment using the [Reposition] Command Action. | |||
If the Main Unit is destroyed, all deployed Non-AI Drones immediately become inactive and fall to the ground. | |||
=== Deviation === | |||
[[File:Diagrams (19).png|frameless|right|250px|]] | |||
A Deviation Roll is only made when specified by a weapon or ability. If that weapon or ability fails its Accuracy Roll, make a Deviation Roll. | |||
Roll a d8 for each missed attack. The result of each roll determines the hex where that attack lands, as shown in the Deviation diagram. | |||
The arrow shows where the targeted Unit is facing. | |||
After determining the landing hex for all missed attacks, resolve each attack from its final location. The targeted hex and all adjacent hexes are affected. | |||
All Units (including allied Units) in those hexes take 50% of the attack’s damage, rounded up, applied to their Torso Unit Section or Cockpit. Units affected may conduct a Defensive Roll. | |||
=== Weapon Redundancy === | |||
A Weapon with multiple copies reduces its AP Cost by 1 for each additional copy after the first, to a maximum reduction of 4 AP. | |||
A Weapon’s AP Cost cannot be reduced below half of its original value (rounded up). | |||
If this reduction would lower the AP Cost to 2 or less, set the AP Cost to 2 instead. For every two copies of that Weapon (including the first), increase its Base Damage by 1. | |||
These effects are based on the current number of copies in use. If copies are removed or destroyed, adjust the Weapon’s AP Cost and Base Damage accordingly. | |||
''Example: Unit A has 4 missile pods mounted to its back. Each missile pod has an AP Cost of 5 and a Base Damage of 12. Applying Weapon Redundancy reduces the AP Cost to 3 (half of 5, rounded up). Since the AP reduction has reached the minimum allowed value, any additional copies no longer reduce AP Cost and instead increase Base Damage. With 2 remaining copies, the Weapon gains +1 Base Damage, increasing it to 13. If Unit A loses 2 missile pods, then the weapon redundancy is adjusted and loses the damage increase bonus.'' | |||
== Terrain == | |||
[[File:ELE.png|right|350px|]] | |||
Battlefield terrain can include anything from towering buildings to small rocks and trees. Some features are mission-specific, while others are represented by colored hexes, each providing unique advantages or disadvantages. Terrain can affect movement, line of sight, and combat outcomes, so its placement is a key part of battle strategy. | |||
=== Elevations === | |||
Elevation adds a tactical layer to the battlefield, providing Units with advantages in movement and combat positioning. The game uses six elevation levels: -2, -1, 0, +1, +2, and +3. Ground Level (0) represents table height and is where most engagements occur unless otherwise specified by the Mission. | |||
Each elevation level represents a 4.5 inch difference from the one above or below it. This can be measured by standing an Action Base 4 or 5 vertically (point-to-point). | |||
Blue Hexes, which represent negative elevations such as lakes or oceans, can only be placed on Ground Level (0). | |||
The +3 Elevation level is reserved for Units with the [AIR] Movement Mechanism, representing high-altitude or flight-level movement. Only Units capable of flight can occupy or move through this elevation. | |||
A Unit’s elevation is determined by its center mass, typically the waist for Mech Units and the cockpit for Vehicle Units. If the Unit’s center mass is higher or lower than 4.5 inches from its current elevation, it is considered to be at the next level. The same rule applies to Structures and Terrain features. | |||
If a Unit moves to an elevation other than Ground Level, place an elevation token beside it to mark its current elevation for reference. | |||
=== High Ground Bonus === | |||
When an attacking Unit is at a higher elevation than its target, it gains a High Ground Bonus (HGB). The bonus value is determined by the elevation difference between the attacker and the target. Units attacking targets at higher elevations do not receive this bonus. Bonuses do not stack. | |||
[[File:HGBnewer.png|none|left|350px]] | |||
=== Hex Colors === | |||
Hex Colors represent different types of terrain and environmental conditions on the battlefield. Each color corresponds to a specific terrain type that provides unique effects, advantages, or restrictions to Units occupying or moving through those hexes. | |||
When setting up a battlefield, Hex Colors must be placed according to the Mission or Terrain rules, with different colors placed at least one hex apart unless otherwise stated. | |||
Some Hex Colors also indicate elevation changes or environmental hazards, such as water, rubble, or impassable terrain. | |||
'''Grey Hex''' | |||
Grey Hexes represent clear, open terrain. Flat ground free of obstructions or environmental hazards. | |||
Units moving or fighting within Grey Hexes experience no bonuses or penalties. These hexes serve as the standard terrain type for most battlefields. | |||
If a hex isn’t clearly marked as having another color, assume its grey. | |||
'''Green Hex''' | |||
Green hexes represent areas covered in trees and dense foliage. | |||
Standard Move actions cost +1 Movement Point per hex. | |||
Apply a –1 Accuracy modifier for each Green Hex within a Unit’s Line of Sight to its target, representing the trees and dense foliage. This penalty stacks cumulatively. | |||
A Unit occupying a Green hex gains the Conceal status effect. | |||
'''Light Blue Hex''' | |||
Light Blue hexes represent bodies of water that are shallow enough to reveal the bottom, yet deep enough to submerge an entire Unit beneath the surface. | |||
These hexes represent –1 Elevation. | |||
When a Unit enters or moves through a Light Blue Hex without the proper Movement Mechanism to operate in or above water, it gains the Euphotic status effect. | |||
'''Dark Blue Hex''' | |||
Dark Blue hexes represent the deepest regions of a body of water, areas devoid of light, subjected to crushing pressure, and near-freezing temperatures. | |||
These hexes represent –2 Elevation. | |||
When a Unit enters or moves through a Dark Blue Hex without the proper Movement Mechanism to operate in or above water, it gains the Abyssal status effect. | |||
'''Red Hex''' | |||
Red hexes represent superheated terrain, such as lava fields or other high-temperature surfaces, capable of damaging even heavily armored Units and vehicles. | |||
Units using the [TRS] Movement Mechanism take 10 damage to all Unit Sections with the [TRS] tag when moving over a Red Hex. | |||
Units with the [AIR] Movement Mechanism are unaffected. | |||
'''Black Hex''' | |||
Black hexes represent collapsed structures or debris. Thick black smoke and unstable footing make these areas treacherous for movement and targeting. | |||
Standard Move actions cost +1 Movement Point per hex. | |||
Units using [TRS] Movement Mechanisms must also roll 1d8 when entering a Black Hex; on a result of 1–2, the Unit takes 5 damage to all Unit Sections with that tag due to shifting rubble. | |||
[AIR] Movement Mechanisms are affected by the movement penalty but ignore the damage effect. | |||
Apply a –1 Accuracy modifier for each Black Hex within a Unit’s Line of Sight to its target, representing the thick smoke and dust. This penalty stacks cumulatively. | |||
'''Tan Hex''' | |||
Tan hexes represent arid, barren landscapes with minimal precipitation and loose, shifting ground. | |||
Standard Move actions cost +1 Movement Point per hex. | |||
Units using the [AIR] Movement Mechanism ignore this penalty. | |||
For every 2 Tan Hexes moved across in a single activation, a Unit gains 1 Sand Buildup Token. | |||
'''White Hex''' | |||
White hexes represent environments blanketed in snow and ice and are subjected to harsh, cold winds. Mechanical strain is increased under these conditions. | |||
Standard Move actions cost +1 Movement Point per hex. | |||
For every 2 White Hexes moved across in a single activation, a Unit gains 1 Ice Buildup Token. | |||
===Buildings & Structures === | |||
[[File:Defense structure chart.png|right|250px]] | |||
Structures can serve as cover, obstacles, or tactical objectives, and may be destroyed to alter the battlefield in a player’s favor. | |||
Buildings and other Structures do not need to be placed on Black Hexes, but when destroyed, any hexes they occupy become Black Hexes to represent collapsed debris. | |||
Some Structures are tall enough to reach higher elevations. To determine this, stand a standard hex vertically (4.5 inches); if the Structure’s height exceeds this, it occupies a higher Elevation Level. | |||
Use the chart below to determine a Structure’s Defense Points, based on its size (number of hexes occupied) and height. The green values represent the most common Structure defenses. Use a d20 to track remaining Defense Points during play. | |||
When attacking a Structure, attack rolls are not required since all attacks automatically hit. Apply Base Damage as normal, and subtract any damage dealt from the Structure’s total Defense Value until it is destroyed. | |||
To target a Unit positioned behind or within a Structure, you must first destroy the Structure, then make a separate attack against the intended Unit. | |||
'''Non-Hex Terrain''' | |||
Also referred to as Scatter Terrain, these are pieces of terrain not connected to a specific Hex Color or Structure. They can serve as visual decoration or provide Cover during gameplay. When setting up the battlefield, players should mutually agree on which pieces grant Cover and which are purely decorative. | |||
'''Terrain Placement''' | |||
Before deploying Units, players must construct the battlefield using terrain pieces. Terrain should create meaningful tactical choices without unfairly favoring either side. | |||
Unless a Mission states otherwise, terrain is placed using the following guidelines: | |||
* Players should use enough terrain to break up long lines of sight and provide multiple movement routes across the battlefield. | |||
* Terrain should be distributed evenly across the play area, avoiding large empty zones or overly dense clusters in a single area. | |||
* Elevated terrain should be limited in height and spread across the battlefield rather than concentrated in one area. | |||
Players may place terrain using the following method: | |||
Agreed Placement: Players take turns placing terrain pieces anywhere on the battlefield following the placement guidelines above. This method is recommended for casual play. | |||
Once terrain is placed, players may not move terrain pieces unless a rule or Mission effect allows it. | |||
Missions may override or add to these rules by specifying required terrain features, fixed objective locations, or special placement conditions. | |||
== Missions == | |||
Missions define the framework in which battles take place. Each mission is built around three core elements: the Deployment Zones, the Primary Objectives, and the Secondary Objectives. | |||
Missions fall into two main categories: Standard and Narrative. Standard missions are designed to emphasize balance and fairness, giving each player an equal opportunity to succeed. Narrative missions prioritize storytelling and scenario-driven play and may result in intentionally uneven or asymmetric battles. | |||
The mission being played should always be chosen before the battlefield is set up. | |||
=== | === Objectives === | ||
Objectives define how a game is won. Most commonly, this involves capturing or holding specific locations on the battlefield, but an Objective may be any condition that can be clearly measured with a success or failure outcome. | |||
Objectives defined by a Mission are referred to as Primary Objectives. These represent the main focus and intended method of victory for that mission. | |||
Some missions may also include Secondary Objectives, which provide alternative scoring opportunities and can be used to help balance gameplay when opposing armies are not optimized for the Primary Objectives. | |||
=== Deployment Areas === | |||
Deployment Areas define where Units are placed on the battlefield and how much space is available for deployment. | |||
Determining Deployment Area: The players can mutually agree on which Deployment Area to begin with or can roll a d8. | |||
[ 1 or 8 ] – Reroll<br> | |||
[ 2 or 5 ] – Standard Deployment<br> | |||
[ 3 or 6 ] – Cornered Deployment<br> | |||
[ 4 or 7 ] – Long Side Deployment | |||
Deployment Order: Players roll a d8; the higher roll chooses who deploys first. The other player chooses table side (A or B). The first player places one Unit in their deployment area, then players alternate placing Units. When one player has no Units left to place, the other deploys all remaining Units. | |||
There are three base types of Deployment Areas: | |||
: | |||
=== | <Gallery mode="nolines" widths=380 heights=250 > | ||
File:Deployment Areas.png|'''Standard Deployment''' | |||
File:Cornered Deployment.png|'''Cornered Deployment''' | |||
File:Long Side Deployment.png|'''Long Side Deployment''' | |||
</gallery> | |||
== | === Core Missions === | ||
These are the primary game modes used for regular play. These missions are designed to be balanced, repeatable, and suitable for any army composition. Each Core Mission provides a defined setup, deployment method, and set of objectives that both players follow. | |||
Unlike Narrative Missions, which are story-driven scenarios with highly specific setups, Core Missions use shared rules and formats to ensure fair and consistent gameplay. Only Core Missions are included in this rulebook. Narrative based missions are available separately on the official website. | |||
The following section presents the available Core Missions and their rules in the following format: | |||
* Mission Name | |||
* Engagement Size | |||
* Deployment | |||
* Primary Objective | |||
* Objective Scoring | |||
* Game Length | |||
* Victory Condition | |||
'''High-Value Target (HVT)''' | |||
Deployment: | |||
: The | * Any | ||
Primary Objective: | |||
* Each player chooses one Unit from their squad to be their designated High Value Target. | |||
Objective Scoring: | |||
* For each enemy Unit destroyed, the player who destroyed it gains 1 Victory Point (VP). | |||
* If the destroyed Unit was the enemy HVT, that player gains 3 Victory Points instead. | |||
Game Length: | |||
* The battle lasts 6 rounds or until one player has no Units remaining. | |||
Victory Condition: | |||
* The player with the most Victory Points at the end of the 6th round is the winner. | |||
'''Command & Control''' | |||
Deployment: | |||
: The | * Standard (Recommended) | ||
Primary Objective: | |||
* The player with initiative rolls 1d4 + 2 to determine the total number of Objective Markers to be placed on the battlefield. Players alternate placing these Markers down starting with the player who moves first. | |||
* Each player may place only one Objective Marker within their own Deployment Area. | |||
All Markers must be placed at least 4 hexes away from any other Marker and must also be 1 hex away from the tables edge. | |||
* Markers may not be placed free-floating on higher elevations. | |||
Objective Scoring: | |||
* If a Unit ends it turn on an Objective Marker, that marker is considered captured by that Units player. | |||
* At the end of each round, a player gains 1 Victory Point for each Marker they control. Objective Markers located within the opponents Deployment Area are worth 2 Victory Points instead. | |||
* A captured Objective Marker remains under a players control even if the Unit moves away, until an opposing Unit ends its turn on that Marker and captures it. | |||
Game Length: | |||
* The battle lasts 6 rounds. | |||
Victory Condition: | |||
* The player with the most Victory Points at the end of the 6th round is the winner. | |||
* If tied, the player who lost the fewest Units wins. | |||
* If still tied, the game is a draw. | |||
'''Asset Retrieval''' | |||
Deployment: | |||
* Long Side (Recommended) | |||
Primary Objective: | |||
* The player with Initiative places one Objective Marker on the battlefield. The Marker must be placed at least 4 hexes away from any Deployment Area. | |||
Objective Scoring: | |||
* If a Unit is on the same hex as the Objective Marker and has a free hand or manipulator, it may use the [Retrieve] Command Action to pick up the Marker. | |||
* The hand or manipulator holding the Marker cannot be used for any purpose while carrying it, including for the [Grapple] Command Action or for two-handed weapons. | |||
* A Unit carrying the Marker may use the [Release] Command Action to place the Marker on its current hex. | |||
At the end of each round: | |||
* A player gains 2 VP if one of their Units is carrying the Marker. | |||
* A player gains 1 VP if one of their Units is on the same hex as the Marker but not carrying it. | |||
Game Length: | |||
* The battle lasts 6 rounds. | |||
Victory Condition: | |||
* The player with the most Victory Points at the end of the 6th round is the winner. | |||
* If tied, the player who lost the fewest Units wins. | |||
* If still tied, the game is a draw. | |||
'''Control Points''' | |||
Deployment: | |||
* Cornered (Recommended) | |||
Primary Objective: | |||
* The player with initiative rolls 1d4 + 2 to determine the total number of Objective Markers to be placed on the battlefield. Players alternate placing these Markers down starting with the player who moves first. | |||
* Each player may place only one Objective Marker within their own Deployment Area. | |||
All Markers must be placed at least 4 hexes away from any other Marker and must also be 1 hex away from the tables edge. | |||
* Markers may not be placed free-floating on higher elevations. | |||
Objective Scoring: | |||
* For If a Unit occupies the same hex as an Objective Token at the end of the round, that player gains 2 VP. | |||
* However, if an opposing Unit is within 1 hex of that Objective Token, no VP is awarded for that token this round. | |||
Game Length: | |||
* The battle lasts 6 rounds or until one player has no Units remaining. | |||
Victory Condition: | |||
* The player with the most Victory Points at the end of the 6th round is the winner. | |||
* If tied, the player who lost the fewest Units wins. | |||
* If still tied, the game is a draw. | |||
{{CoreNavigation}} | {{CoreNavigation}} | ||
[[Category:Rules]] | [[Category:Rules]] | ||
Latest revision as of 22:55, 23 April 2026
Introduction
The 30 Minute Missions: Wargame (30MM:W for short) is a mech-based tabletop miniatures game using Bandai Spirit's 30 Minutes Missions line of 1/144 scale mecha model kits. The focus of this game is on:
- The ability to play missions in, roughly, 30 minutes (excluding setup); and
- The customizability and modular designs for model kits.
The game is played over a series of rounds. Each round consists of alternating turns between each player choosing one of their Units, moving to the best position, attacking the enemy, or holding an objective. The battlefield is played with varying terrain, elevations, and structures. Missions can vary from eliminating the enemies to securing intel.
Objective
The game is won after the primary objective of the mission you are playing has been completed. These range from holding an objective for multiple turns, getting an object and moving to your side of the board, or simply destroying the enemy forces.
Required Components

- 30 Minutes Missions Models (assembled)
- Datasheets (filled out)
- Hex Grid Game Mat
- Game Tokens
- D8 Dice
- D20 Dice
- Various Hex Colors
Units and Squads
Each individual model on the battlefield is referred to as a Unit. All Units controlled by a single player together make up that player’s Squad. When a rule refers to a Unit, it applies only to that specific model. When a rule refers to a Squad, it applies to all of that player’s Units collectively.
Dice
To play the 30MM: Wargame, you will need two types of dice: eight-sided dice (D8) and twenty-sided dice (D20). Each player should have at least 5–10 D8s to keep gameplay fast and 1 D20 for every Unit they control. The D20 is used to track a Unit’s Action Points (AP), while the D8 is used for all attack, defense, and ability rolls. Occasionally, the rules may reference alternate dice notations such as D4, 2D8, or D8 + 1:
- D4: Roll a D8 and halve the result, rounding up.
- D8 + 1: Roll a D8 and add 1 to the result.
Rolls and Rerolls
When making a roll, the player must roll equal to or higher than the target value listed under the Unit’s Modified Stat on its Datasheet. Each roll represents a single attack, defense, or action attempt. Example: Unit A makes two ranged attacks against Unit B, which has a Modified Evasion Stat of 7. The defending player rolls 2D8, scoring a 6 and a 7. This means one attack hits (6) and one attack is evaded (7). If an ability allows you to reroll dice, select the number of dice indicated and reroll them, starting with the lowest results first. The outcome of the reroll is final, even if it is worse than the original roll.
Tokens

Tokens are used to track various effects, conditions, and states that occur during gameplay. Whenever a rule or status effect instructs a player to place a token, it should be placed face-up next to the affected Unit to clearly indicate the current condition.
Objective Markers

Objective Markers represent key tactical points, data nodes, or energy beacons on the battlefield that players must capture, defend, or destroy to complete mission objectives.
The standard Objective Marker model is built using a combination of Roy Roy leg parts (from the 30 Minute Missions Alto or Portanova kits), thrusters from the Option Parts Set 1, and structural components from the J1 runner, included in most 30MM kits.
Players may use Objective Marker tokens in place of the physical kit-built markers if preferred. Alternatively, an Objective Marker can be any model, piece, or object the players agree upon prior to starting the game, so long as all participants clearly understand what represents an active objective.
When placed on the map, Objective Markers do not obstruct movement or Line of Sight unless specified by the mission.
Datasheet
Each Unit is represented by a Datasheet, which contains all of the information required to operate that Unit effectively on the battlefield. The Datasheet lists every attribute, ability, and piece of equipment necessary to complete a mission. While Units can differ greatly in how they function, every Datasheet follows the same layout and includes the following modules:
- Unit Sections – Displays each section (Head, Torso, Left Leg, etc.) of the Unit and its Durability Points (DP).
- Specifications – Lists the Unit’s detailed attributes such as classification, base AP, movement (standard and thruster), as well as total thruster durability.
- Modified Stats – The Unit’s Accuracy, Assault, and Evasion values, used when making Attack and Defense Rolls.
- Core Type – Shows the Unit’s base model and core statistics.
- Unit Information – Includes the Unit’s Name, Type, and Movement Mechanism(s).
- Pilot Information – Lists the Pilot’s Name, Rank, and Pilot Cost.
- Systems, Mods, & Traits – Details the Unit’s special abilities and upgrades.
- Weapons & Equipment Inventory – Records all weapons, gear, and equipment equipped by the Unit.
- Deployment Cost (DC) – The total cost required to field the Unit in battle.

Unit Information
Mechs
A Mech is a humanoid combat Unit characterized by articulated limbs, modular construction, and the ability to operate across various terrains and elevations. Mechs are designed for front-line combat, tactical flexibility, and diverse loadouts, capable of fulfilling multiple battlefield roles. Design Choices of Mechs:
- Humanoid Frame: Possesses articulated arms, legs, and a torso, enabling advanced maneuverability such as jumping, climbing, or changing facing independently.
- Combat Versatility: Capable of engaging in both ranged and melee combat; well-suited for precision attacks, flanking, and defensive holds.
- Reactive Posture System: Can assume crouching, and prone positions as well as offensive, defensive, and parry stances to affect LoS, hit zones, and evasion.
Vehicles
Vehicles are modular support Units designed to augment, transport, or reinforce Mech Units on the battlefield. They can operate independently or in tandem with other Units, often providing specialized mobility, firepower, or utility functions. Design Choices of Vehicles:
| Total Durability | Classification | Base Movement | Base Action Points |
|---|---|---|---|
| 0 - 75 | Class 1 | 5 | 1d8 + 2 |
| 76 - 150 | Class 2 | 4 | 1d8 + 2 |
| 151 - 225 | Class 3 | 3 | 1d8 + 3 |
| 226 - 300 | Class 4 | 2 | 1d8 + 4 |
| 301+ | Class 5 | 1 | 1d8 + 4 |
- Dedicated Support Platform: Mech Units can ride on/in various vehicles to move around the battlefield.
- Modular Integration System: Can combine with Mech Units for additional firepower.
Classifications
There are 5 different classifications that provide different starting bonuses and limitations based on the size of your Unit. This is determined by the Total Durability value of all of Core Parts combined.
Playing the Game
All missions take place on a battlefield overlayed by a hexagonal grid. A single hex measures 4.5” from point-to-point and 3.9” from side-to-side. This is the same size as an Action Base 4/5. A battlefield measures 14 hexes on the long side and 11 hexes on the short side (58.5”x38.3”).
Setup

Players will first lay out a battlefield mat as preferred or, if playing a scenario, as the scenario specifies.
Before determining turn order, all players must agree on the Engagement Size (the total Deployment Cost limit of all Units in a players squad). Once the Engagement Size is set, each player assembles their Squad accordingly.
Next, players will roll a 1D8 to determine who goes first. The higher roll then determines who is the attacker or defender. The attacker gets to start first but the defender gets to choose which table side to start on (A or B side). If both players roll the same, then both players conduct a reroll.
In a 3 (or more) player game, players choose which side (attacker or defender) to participate in and share Units and turns with their teammates. At the start of the round, players roll for initiative with the higher roll, giving the first chance to move a Unit.
Unit Deployment

Once the attacker and defender have been determined, it is now time for the players to deploy their squads to the battlefield. Each side has a dedicated Deployment Area laid out in the mission details. Standard Deployment Areas are the first 3 hexes from the short side table edge on both sides.
Starting with the attacker, they will place one Unit within their Deployment Area on any elevation/terrain they see fit. If their Unit flies/swims, they may start in the air/water but must place a token down notating its elevation. Once the attacker's Unit has been deployed, the defender does the same. In an alternating fashion, both players continue to deploy Units until everyone is on the battlefield.
After both sides have deployed their Units, the Deployment Phase has ended and gameplay can begin.
Action Points
At the start of a Unit's activation, before moving, the player must roll 1d8 to determine the number of Action Points (AP) available during that turn. Action Points are spent to perform various actions, such as entering a prone position, deploying a drone, or firing a weapon.
After rolling, the result is added to the Unit’s Base AP value as listed on its Datasheet in the Specifications Section. A Unit may store unused AP from one turn to the next. However, it cannot exceed a total of 16 AP at any time unless stated otherwise.
Phases of a Turn
The 30MM: Wargame consists of a series of alternating turns that make up a number of rounds. Each turn consists of three phases. The players will execute these phases in sequential order for every Unit that is activated. After a Unit has been activated and completed all three phases, play passes to the next player in the established play order (e.g., Attacker 1, Defender 1, Attacker 2, Defender 2, etc). Once all Units have been activated, progressed through each phase, and become inactive, the round ends and a new one begins.
Each turn includes the following phases, performed in the following order:
- Movement Phase
- Ranged Combat Phase
- Close Combat Phase
Movement Phase
The player may now choose a Unit to activate and begin its Movement Phase. Once selected, the player rolls for Action Points as explained in the section above. If a player chooses not to activate a Unit or the Unit is unable to act (due to a status effect, lack of AP, or other restriction), the Unit is immediately marked Inactive and play passes to the next Unit in turn order.
After the player has determined the amount of AP the Unit has, they then can move to their desired location. In the Specifications Section of the Datasheet, there is a section called “Standard Movement”. This section shows how many hexes that Unit can move in a single activation. A Unit can move any number of hexes to a maximum of what that section shows. When moving a Unit, its facing is also important, as it affects both offense and defense. Changing Facing also costs a single movement point. Greater details on how facing works can be found in the Facings Section. Below the standard movement you’ll also see “Thruster Movement”. This option is only available to Units that meet certain requirements as found in the Thruster Movement Section below. A Unit also has the option of not moving at all. Outside of this basic information there are other steps that can be taken listed in the next section Movement.
Any terrain effects gained must be resolved before moving on to the next phase.
Ranged Combat Phase
After moving the selected Unit to the desired hex, the player may then make attacks with ranged weapons. All attacks made must subtract the weapons AP cost from the Units current stored AP. If the Unit does not have an adequate amount of AP, then the Unit cannot make an attack with that weapon.
If the player decides to not make a ranged attack (to save AP or any other reason they decide), they may skip this phase and move to the next but cannot return to it.
Declaring Weapons Fire
The player must then choose a target to attack. Once a target has been established, then the player must declare which Unit Section on that target they are going to attack.
Common Unit Sections include Head, Torso, Left Arm, Right Arm, Left Leg, and Right Leg.
A player must declare all attacks they plan to make at this time, specifying which weapon(s) they intend to fire and at what sections. Players may not change an attack declaration once made.
Resolving Weapons Fire
Once a target and Unit Section are declared, the player will then resolve the weapons fire one weapon at a time. All declared attacks must be made, even if the intended target is destroyed before all attacks against it have been resolved. The order in which a Units weapons are rolled and resolved is up to the Units player.
Close Combat Phase

Players repeat the steps given for the Ranged Combat Phase except with close combat weaponry (typically weapons with a range of 1).
Once the player has resolved all close combat damage, the Unit becomes inactive and ends its turn. At which point, the opposing player chooses a Unit and begins the cycle again.
Win Conditions
Players repeat the sequence of play given above until one side achieves victory. Under normal circumstances, the side with the last surviving Unit on the battlefield wins. If the last Units from each side are destroyed simultaneously or if the last Units from each side are rendered Inoperable, the game is a draw. Players may set other victory conditions by mutual agreement before play begins. In addition, some missions have special victory conditions of their own.
Unequal Units on Map
When both sides have an equal number of Units, each player takes a turn activating a single Unit, then the other player activates a single Unit, and so on. If the number of units on each side is unequal, this procedure is altered.
If one side has more activatable units than the other, the players will continue to alternate Unit activations until one player can no longer activate their Units for that round. At which point, the other player will continue activating their Units until they are all deactivated and the round is over.
.png)
Movement
During the Movement Phase, Units may reposition and adjust their elevation on the battlefield to secure tactical advantage.
Standard Movement
A Unit’s Standard Movement value is listed in the Specifications Section of its datasheet. This value represents the total number of Movement Points (MP) the Unit may spend during its Movement Phase, determined by its Classification. A Unit may move into the hex it is currently facing or into the hex directly behind it; movement into any other hex requires a facing adjustment. Entering a clear hex costs 1 MP whether moving forward or backward, while movement costs for other terrain types vary as specified elsewhere in the rules.
Standard Jump
A Mech Unit may perform a Standard Jump as part of their Standard Movement. A Standard Jump allows the Unit to leap over the hex directly in front of it and land two hexes forward while maintaining its facing, at a cost of 2 MP. The Unit must remain on the same elevation throughout the jump and cannot leap over a hex, structure, or Unit that occupies a higher elevation level.
A Unit may descend to a lower elevation during a jump as long as it has enough MP to complete the movement; otherwise, Fall Damage is applied based on the number of elevation levels dropped. Upon landing, all terrain effects of the landing hex immediately apply. A Unit may perform multiple Standard Jumps during its Movement Phase, provided it has sufficient MP remaining.
-
 The image on the left shows the side view of Unit A moving across a blue hex to reach the other side. Without jumping, it will cost the Unit 4 movement points to reach the other side.
 -
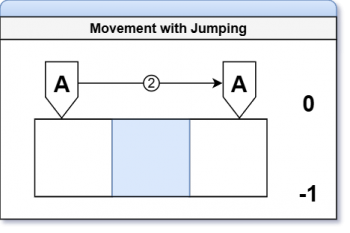 The Image on the right shows the same side view of Unit A moving across a blue hex to reach the other side. The Standard Jump was used and saved the Unit 2 movement points.


Facings
Each hex on the battlefield has six sides. A Unit must always face one of these sides; this is referred to as its Facing.
Changing a Unit’s Facing costs 1 Movement Point, deducted from its Standard Movement allowance.

Thruster Movement
When a Unit is equipped with thrusters, it may perform a Thruster Movement instead of a Standard Movement. Thruster Movement allows the Unit to move up to double its standard movement points in a single turn, as indicated by its Thruster Movement value.
Thruster Movement must be performed in a straight line, and the Unit must normally remain on the same elevation from start to finish.
Thruster Jump
As part of Thruster Movement, a Unit may perform a Thruster Jump, allowing it to ascend or descend elevations during its movement.
A Unit initiates a Thruster Jump by declaring Thruster Movement.
When performing a Thruster Jump, the Unit may move in a straight line and change elevations at any point along its movement path, up to its Thruster Movement value. The Unit may land on a hex at a higher or lower elevation than where it began.
If a Unit ends its movement on a hex without solid ground beneath it and does not have the Aerial [AIR] Movement Mechanism, it immediately falls to the next available elevation and suffers Fall Damage.
Additional Rules
- The Unit may move any number of hexes, up to its Thruster Movement value.
- After completing a Thruster Movement, the Unit must maintain its facing direction, forfeit its Combat Phase (unless otherwise stated), and become inactive.
- If all thrusters on the Unit are destroyed, it can no longer perform Thruster Movements.
Elevation Changes
Units may change elevation during the Movement Phase. Ascending or Descending one elevation level costs 1 Movement Point in addition to the 1 Movement Point to move into the new hex.
Backward Movement: Units moving backward cannot change elevation.
Unauthorized Elevation Changes: A Unit cannot force another Unit to ascend to a higher elevation. A Unit may force another Unit to descend to a lower elevation. Units forced downward suffer Fall Damage (pg. 32).
Terrain
Non-Grey terrain types, those with additional environmental effects, require extra Movement Points to move through. Certain terrain types may also grant bonuses or impose restrictions on movement and other actions while a Unit occupies them. Refer to the Hex Colors for full details.
Hex Occupancy
A Unit may move through a hex occupied by a friendly Unit. A Unit may not move through a hex occupied by an enemy Unit unless executing a Thruster Impact. A Unit may end its Movement Phase in a hex containing friendly Units, provided that each Unit maintains at least 80% of its model within the hex, based on best judgment, and the Units do not physically overlap. Units may be repositioned freely within the hex as long as at least 80% of the model remains inside the hex (this does not require a Command Action to perform) and the Unit maintains the facing established at the end of its movement. Movement within the hex may be used to set up ambushes, establish firing positions, or improve cover. Opposing Units cannot occupy the same hex unless otherwise specified or unless they are positioned on different elevation levels.
Movement Mechanisms
A Unit’s method of traversing the battlefield is defined by its Movement Mechanism. These dictate how a Unit interacts with terrain, elevation, and movement-related effects. A Unit’s assigned mechanism is determined by the components used during its construction and is listed on the Unit’s datasheet as a three-letter tag. Units that are considered Mechs do not qualify for any Vehicle additional rules. Tags appear as 3 letters within brackets and allows players to quickly identify how a rule or item functions. For a full explanation, see Tags. There are three types of Movement Mechanisms.
Terrestrial Movement
Tag: [TRS] The standard movement mechanism for all ground-based Units. These Units traverse solid terrain using walking, rolling, or similar locomotion.
This mechanism does not require Thruster Durability unless it is performing a Thruster Movement.
Units with this mechanism must use elevated terrain to move to higher elevations. A Terrestrial Unit cannot move directly to a higher elevation unless there is accessible terrain.
To qualify for this mechanism, a Unit must have at least one of the following Unit Sections: Legs, Treads, Wheels, or comparable locomotion systems.
Terrestrial Vehicles
Land-based vehicle Units follow additional rules to reflect their unique combat and movement traits.
Requirements:
- Must contain at least one [TRS] marked Unit Section.
- Must not contain an [AQN] or [AIR] tag.
Restrictions:
- Weapon range is halved when firing through green hexes.
- Movement costs 2x when crossing green hexes.
Bonuses:
- Field of View (pg. 18), the area the Unit can target Units, is all 6 hexes around the Unit.
- Main Cannon has an AP reduction of 3 (to a minimum of 4).
Aquatic Movement
Tag: [AQN] The standard movement mechanism for all water based Units. These Units traverse and maneuver through aquatic terrain such as oceans, rivers, and lakes, freely adjusting their position within submerged environments.
Units with the [AQN] Movement Mechanism use Movement Points (MP) as normal Standard Movement to navigate Blue Hexes with two exceptions: ascending upward in the water costs 1 MP, while descending to a lower elevation costs no additional MP.
To qualify for this mechanism, a Unit must have at least one of the following: Fins, Thrusters, or comparable propulsion sections. A Unit must also meet or exceed the required Thruster Durability threshold to maintain this mechanism.
If a Unit’s Thruster Durability drops below the required threshold, it immediately loses access to [AQN] movement and becomes subject to Blue Hex terrain effects.
Aquatic Vehicles
Water-based vehicle Units follow additional rules to reflect their unique combat and movement traits.
Requirements:
- Must contain at least one [AQN] marked Unit Section.
- Must not contain an [TRS] or [AIR] tag.
Restrictions:
- Cannot make normal movements on 0 Elevation (Ground Level).
- Can only move over light/dark blue hexes; failure to do so results in the Unit gaining the Grounded status effect.
Bonuses:
- Attacks made with missile pods do not require LoS.
Aerial Movement
Tag: [AIR] The standard movement mechanism for all air based Units. These Units operate above the battlefield, maintaining altitude without reliance on solid ground and freely traversing terrain by air.
Units with the [AIR] Movement Mechanism use Movement Points (MP) to travel between hexes as normal Standard Movement to navigate, but they ignore all ground-based terrain effects unless specified to effect them. These Units can also adjust their elevation up or down by 1 level at the cost of a single MP rather than the standard 2.
Units with this mechanism cannot fly through Green Hexes (dense vegetation or forest terrain).
If a Unit loses access to [AIR] while airborne and without solid ground beneath it, it immediately falls to the lowest available elevation and suffers fall damage as normal. See the Minimum Thruster Durability chart on the next page for more information.
To qualify for this mechanism, a Unit must have at least one of the following: Wings, Rotors, Thrusters, or comparable propulsion systems. A Unit must also meet or exceed the required Thruster Durability threshold to maintain this mechanism.
Aerial Vehicles

Air-based vehicle Units follow additional rules to reflect their unique combat and movement traits.
Requirements:
- Must contain at least one [AIR] marked Unit Section.
- Must not contain an [AQN] or [TRS] tag.
Restrictions:
- Cannot make normal movements on 0 Elevation (Ground Level).
- Cannot move backwards.
- Must use all movement points (standard or thruster) during activation; failure to do so results in the Unit gaining the Grounded status effect.
Bonuses:
- Strafing Runs: When the Unit passes directly over enemy Units (at one elevation higher) during the Movement Phase, it may pause movement to conduct a single ranged or close combat attack. After resolving the attack, the Unit continues it movement. This can be repeated multiple times during a single movement phase until the Activated Unit's AP is 0 or no more targets are within the movement path.
Combat
Once the player’s chosen Unit completes the Movement Phase, they engage in combat. Units use two forms of combat: Ranged Combat and Close Combat. Ranged Combat utilizes missiles, beam rifles, rockets, and many others. Close combat utilizes beam swords, pile bunkers, heavy metal swords, and even other Units.
Targeting Basics
This section establishes how a Unit selects and validates a target before making an attack.
Defining a Target
All targets fall into one of two categories: Units or Structures.
- Units include mechs, vehicles, drones, and any weapons or equipment integrated with them.
- Structures refer to any constructed object of human origin, including buildings, fortifications, or installations.
A player cannot deliberately target an allied Unit.
Field of View
If an attacking Unit has Line of Sight to its intended target, the player must then check whether the target is within the Unit’s Field of View (FoV).
A Unit’s FoV begins with the hex directly in front of it and includes the adjacent hexes to its immediate left and right, forming a forward-facing arc. This arc expands outward in a cone-shaped pattern from the attacker to the edge of the battlefield.


Line of Sight

Line of Sight (LoS) is used to determine visibility between an attacking Unit and its designated target. To determine LoS, the player must use the actual line of sight from the physical model. This is done by lowering their perspective to the eye level of the Unit’s cockpit or sensor array (head) and verifying whether the targeted Unit Section is visible. If any part of the target section is visible, LoS is established. LoS may be obstructed by terrain, structures, or other Units, friendly or hostile.
Terrain between the attacker and target may partially or fully obstruct LoS. If an attack passes through terrain with visibility modifiers (e.g., forests or debris), apply the listed penalties under Terrain Effects. When declaring an attack, the player must also ensure that the weapon system being used has an unobstructed LoS to the target. This is verified by physically aiming the weapon at the intended target. The line from the weapon to the target must be free of any obstructions, including terrain features, structures, or other Units.
Targeting Conditions
This section establishes how terrain, elevation, and other Units may obstruct or alter attacks, covering rules for partial obstruction, height differences, terrain effects, and intervening obstacles.
Partial Obstructions
In certain situations, a Unit may be partially obscured by terrain, structures, or other Units. Only the visible Unit Sections may be declared as valid targets for attacks.

Terrain Elevations
Each hex will have its elevation marked on the map. If no elevation marking is present, the hex is treated as Ground Level (Elevation 0) by default. Hexes with elevations above 0 represent hills or elevated terrain. Hexes with elevations below 0 represent depressions or valleys.
- Water: Water hexes descend to a depth of Elevation -1 to -2 below ground level, with Elevation -2 representing maximum depth. The lower the elevation level, the deeper the water. A Unit occupying a Water hex is always considered to be at the lowest elevation of that hex.
- Forest: Forest hexes share the same elevation as the terrain they occupy. For example, a forest located on Ground Level (0) is also considered to be at Elevation 0. Units occupying Forest hexes are positioned on the base terrain elevation—not atop the treetops.
Unit Height & Width
Standard Mechs, Vehicles, and Drones positioned at ground level (Elevation 0) occupy less than one full elevation in height. An exception is made if a Unit’s waist section (where the legs and torso connect) extends into Elevation +1. In such cases, the Unit’s base elevation is considered +1. Units are considered to be at the elevation of the hex they currently occupy when calculating LoS. Most Units occupy less than one full hex in width. Large Units must also remain within a single hex but are permitted to extend up to 80% of their model beyond the hex boundary, provided their base remains clearly and visibly within the hex.
Weapon & Attack Requirements
Defines the conditions a Unit must meet to declare an attack, including weapon availability, range, line of sight, and any special restrictions.
Weapon Requirements
Before declaring an attack, the player must confirm that the Unit can use the weapons in its inventory by meeting the following conditions:
- AP Cost: Each weapon has a designated Action Point (AP) cost. This is the number of AP required to perform a single attack.
- Range: All weapons have a listed range value. The intended target must be within this range.
- Equipped Weapons Only: A Unit may only attack with weapons that are currently equipped—either mounted or held in-hand.
Attack Declaration
Once a target has been confirmed within the attacking Unit’s Field of View (FoV), the player must declare an attack. When declaring an attack, the player must state the following (in any order):
- The weapon or weapons being used.
- The target Unit, including the specific Unit Section or Sections being aimed at.
After the attack is declared, the total Action Point (AP) cost of all chosen weapons is subtracted from the Unit’s available AP. Example: Unit A uses its beam saber to attack 3 times. The beam saber’s AP cost is 5, a total of 15 AP will be subtracted.
Combat Roll Resolution
This section explains how players resolve combat by making Accuracy, Assault, and Evasion rolls, including the effects of Critical Hits and Misses.
Attack Rolls
An Attack Roll is a dice roll made by the attacking player to determine whether their Ranged or Close Combat attack is On Target. On Target simply means the attack that was made has successfully targeted the intended area. Once all Attack Rolls have been made, the targeted Unit’s player will then make their rolls.
Accuracy
Also known as rolling for accuracy, is the process used to determine whether a ranged attack is On Target. To perform an Attack Roll, the attacking player rolls one d8 for each declared attack. The result of each roll is then compared to the Unit's Accuracy Stat:
- If the roll is equal to or higher than the Unit’s Accuracy Stat, the attack is considered On Target.
- If the roll is lower, the attack misses completely.
Assault
Also known as rolling for assault, is the process used to determine whether a close ranged attack is On Target. Similar to accuracy rolls, the attacking player rolls one d8 for each declared attack. The result of each roll is then compared to the Units Assault Stat:
- If the roll is equal to or higher than the Unit’s Assault Stat, the attack is considered On Target.
- If the roll is lower, the attack misses completely.
Defense Rolls
A Defense Roll is made by the defending player to determine whether incoming On Target attacks successfully hit their Unit. After all Defense Rolls have been resolved, any attacks that successfully hit the Unit must be applied and damage calculated.
Evasion
Also known as rolling for evasion, this process determines whether On Target attacks actually hit the defending Unit. To perform an Evasion Roll, the defending player rolls a d8 for each On Target attack made by the attacker. Each result is then compared to the defending Unit’s Evasion stat:
- If the roll is equal to or higher than the Evasion stat, the attack is successfully evaded and no damage is taken.
- If the roll is lower, the evasion fails and the Unit takes damage to the targeted Section.
Critical Rolls
When making Attack or Defense Rolls, there are two types of Critical Rolls: Critical Hits and Critical Misses.
- Critical Hit: Occurs when the die result is an 8. The attack cannot be evaded and deals 1.5× the weapon’s Base Damage (round up).
- Critical Miss: Occurs when the die result is a 1. The attack automatically misses.
Damage & Effects
During combat, weapons deal a set amount of damage known as Base Damage. This value can be found in the Base Damage column of the Unit’s Datasheet. Base Damage represents the standard amount of damage a weapon inflicts before other effects are applied. This amount is dealt for each successful hit on a target.
Resolving Damage
When an attack is successful, the damage is applied to the Unit Section chosen by the attacker. The defending player reduces that section’s Defense Points (DP) by the weapon’s Base Damage value. This happens during the attacking players turn and must be resolved before the turn ends. If the DP of that section is reduced to zero, that section is destroyed. When a Unit Section is destroyed, it becomes non-operational and can no longer be targeted. All weapons, equipment, and special abilities located in that section are also destroyed and removed from play.
Resolution Order
All attacks are resolved in the order they occur. When resolving multiple hits on a single Unit from the same weapon, all hits are rolled and resolved simultaneously. When resolving hits made with different weapons, resolve all rolls and resulting damage from one weapon before proceeding to the next. Example: Unit A successfully hits Unit B’s torso with three beam rifle shots, dealing a total of 15 damage. This value is then subtracted from the torso’s Defense Points. Unit A then hits Unit B’s torso again with two rocket shots, dealing a total of 20 damage. This value is also subtracted from the torso’s Defense Points. Destroyed Unit Sections When a Unit Section is destroyed, the player may remove the corresponding piece from the model or place a Destroyed Limb token to mark it. In either case, the associated Status Effect is immediately applied:
Destroyed Vs. Inoperable
A Unit is considered Destroyed when its Torso (for Mechs) or Cockpit (for Vehicles)
Durability Points are reduced to 0. When a Unit is destroyed, leave its model on the battlefield, placed face down. If the hex it occupies does not already contain a terrain effect, that hex becomes a Black Hex. A Unit is considered Inoperative when its core section remains intact but it can no longer function effectively:
- Mechs: If the Torso Unit Section is intact but all limbs are destroyed, the Unit is Inoperative.
- Vehicles: If the Cockpit Unit Section is intact but the Unit loses all mobility sections, it is Inoperative.
An Inoperative Unit may still participate in an engagement if it has functional Drones, Mounted Weapons, or Handheld Weapons.
Status Effects
Status Effects represent ongoing conditions that change how a Unit behaves in combat. They can come from abilities, weapons, or terrain features.
| Name | Effect |
|---|---|
| Abyssal |
|
| Airborne |
|
| Blinded |
|
| Conceal |
|
| Crippled (Partial) |
|
| Crippled (Severe) |
|
| Destroyed Limb |
|
| Euphotic |
|
| Grounded |
|
| Hold |
|
| Ice Buildup |
|
| Immobilized |
|
| Limbless |
|
| Sand Buildup |
|
| Static Buildup |
|
| Submerged |
|
| System Error |
|
Close Quarters Combat
This sections outlines the rules for direct, physical engagements between Units at close range.
Basic Attacks
A Unit can make basic attacks during its Close Combat Phase, only if no weapons are equipped. Basic attacks represent using the Units body (punches, kicks, strikes, etc.) to deal minimal damage. All Units can make these attacks and does not need to be on the Units Datasheet. These do not gain bonuses from Systems, Mods, or Traits unless otherwise stated.
- Cost: 1 AP
- Range: 1
- Damage: 1 Base Damage
Grappling
Grappling occurs when a Unit physically seizes another. Only Units with manipulators (at least 1) can perform a Grapple, and it can only be initiated during the Close Combat Phase. To perform a Grapple, follow the chart below:
- Engage Grapple
- Attacker pays 2 AP.
- Attacker rolls for Assault.
- Grapple Check
- Success > Go to Step 3.
- Fail > Grapple Ends (player may go back to step 1).
- Grapple Options (Attacker chooses one)
- Throw > Go to Throw.
- Hold > Go to Hold.
- Collision Damage
- Formula: 2 x (Defender Class x Throw Distance)
- Special Cases:
- Structure Intact
- Structure Destroyed
Throw A Unit physically throws another Unit a set distance. Max Throw Distance (in hexes): (Attacker Class – Defender Class) + 2
A Unit cannot throw a Unit that has a classification higher than its own. Landing Outcomes (choose based on destination):
- Into a Structure:
- Defender is placed into the Structures hex (not on the structure), FoV facing the Attacker.
- Apply collision damage to the Defenders Torso Unit Section and the Structure.
- Into a Hex:
- Defender lands supine, FoV facing the Attacker.
- Apply collision damage to the Defenders Torso Unit Section.*
- Into a Hex with other Unit(s):
- Each Unit in the hex must make an Evasion Roll.
- Failure: Apply collision damage to the Unit(s) Torso Unit Section.
- Success: Move into any adjacent open hex within their FoV, facing any direction.
- If no hex is available, the Unit(s) instead applies collision damage to their Torso Unit Section.
- Defender also lands supine, FoV facing the Attacker, and applies collision damage to the Torso Unit Section.
- Blue Hexes:
- Units thrown into a blue hex take half collision damage (rounding up).
Hold
A Hold represents one Unit grappling and locking down another in close combat, restricting its ability to act.
- Initiating a Hold:
- Move the Attacking Unit into the same hex as the Defending Unit.
- The Defending Unit immediately gains the Immobilized status effect.
- Breaking a Hold:
- The Defending Unit must use the [Break Contact] Command Action to escape.
- Restrictions:
- While holding, the Attacker cannot move but may still attack using mounted weapons or any handheld weapon without the [2H] tag.
Structure: Intact If a thrown Unit collides with a structure and the damage deal does not exceed the structures current defense:
- The Unit gains the Immobilized status effect.
Structure: Destroyed If a thrown Unit collides with a structure and the damage dealt exceeds the structures current defense:
- The Structure collapses onto the Unit.
- Apply the Structures defense value as bonus damage to the Torso Unit Section.
- Remove the destroyed structure and replace it with a Black Hex.
- Place the Defending Unit supine, with its FoV facing the Attacker.
- On the Defenders next activation, it must use the [Recover] Command Action to stand. If it does not, the Unit remains supine.
Example: Unit A grapples Unit B, spends 2 AP, and succeeds on an Assault Roll. With a higher Classification (4 vs 3), Unit A throws Unit B 3 hexes (4-3)+2. Unit B lands 2 hexes away, supine and facing Unit A, and suffers 12 Torso damage (3x2)x2 from the collision.
Thruster Impact
A Thruster Impact occurs when a Unit uses thrusters to rapidly advance and collide with an enemy Unit, causing damage and displacement.
When a Unit conducts a Thruster Movement and an enemy lies within its movement path, the Thruster Movement becomes a Thruster Impact.
Thruster Impacts can also be performed in the air or in the water.
Range Requirements:
- Target must be beyond the Units Standard Movement Range.
- Target must be within the Units Thruster Movement Range.
AP Cost:
The attacking Unit pays 2 AP + 1AP per 2 hexes traveled (rounding up).
Resolution:
- Confirm the target is within range and select the endpoint hex.
- Spend the AP cost.
- The attacking Unit makes an Assault Roll:
- Failure: The Unit moves to the closest hex in its path toward the target and ends its turn.
- Success: The defending Unit chooses one of the following responses:

Evade
- Defender makes an Evasion Roll.
- Success: Move to any open hex within current FoV and out of the attackers path, facing the same direction. Flying Unit may move one elevation higher.
- Failure or no available hexes: Attacker slams the defender one hex past the endpoint. Damage is applied to the defenders Torso/Cockpit Unit Section.
- Attacker continues to the designated endpoint and ends its turn.

Stand Firm
- Defender makes an Assault Roll.
- Success: The defender blocks the charge (see Class Difference) and damage is applied to the attacking Units Torso Unit Section. The attacker stops in the adjacent hex.
- Failure: Attacker slams the defender one hex past the endpoint. Damage is applied to the defenders Torso/Cockpit Unit Section.
- Class Difference: If the defender’s Class is higher than the attacker’s, the charge is stopped completely. If the defender’s Class is equal to or lower, the charge continues as normal and both Units take damage.

Damage: Thruster Impact damage is determined by the Attacking Units class (see below).

Other Situations While engaging in a Thruster Impact, the attacking Unit may run into various situations.
Slamming Unit into Elevated Terrain:
If a Thruster Impact attempts to move a target into a hex with elevated terrain, the target does not enter that hex. Instead, it takes 2x normal Thruster Impact damage to its Torso/Cockpit Unit Section. The attacker ends movement in the adjacent hex.
If the targeted Unit successfully evades the incoming attack, the attacking Unit instead collides with the elevated terrain, takes the full damage from the impact, and ends its turn in a hex adjacent to that terrain.
Slamming Unit into Multiple Units:
If a Thruster Impact attempts to move multiple targets, the action cannot be completed.
Other Actions
This section covers special actions and mechanics outside of standard movement and combat. These include Command Actions that allow Units to alter their behavior, Systems, Mods, and Traits that provide unique abilities or upgrades, and rules for handling falling and fall damage during play.
Command Actions Command Actions are special actions a Unit can perform during its turn that are not tied to any specific phase. Each Command Action costs 2 Action Points (AP) and may be used multiple times in a single turn unless otherwise stated.
Command Actions are divided into three categories:
- State: Effects that resolve instantly when used and do not remain active..
- Stance: Actions that may be taken out of turn. Activating a Stance immediately ends the Unit’s current turn.
- Order: Commands issued to Drone Units, allowing them to act under the Main Unit’s direction.
| Name | Category | Description |
|---|---|---|
| Recover | State | A Unit returns to a standing position from knocked down state.
If the Unit is knocked prone or laying on the ground, return to its standing position. |
| Press On | State | The pilot pushes the Unit beyond safe limits, refusing to yield ground.
Unit gains an additional Standard Movement Point. |
| Break Grapple | State | With a surge of strength, the Unit tears free from its opponent’s hold.
Perform an Assault Roll: If successful, the Unit breaks free. If unsuccessful, no change. |
| Exchange | State | The Unit swiftly switches its weapon loadout to adapt to the changing battle.
Allows a Unit to replace an equipped Weapon with one being carried. |
| Retrieve | State | A mechanical arm or manipulator reaches out to reclaim a dropped item.
A Unit with a free hand may pick up a dropped or disarmed allied weapon from the same hex and equip it. |
| Release | State | The Unit disregards a weapon or equipment to lighten its load.
A Unit may drop a Weapon or Equipment from one of its hands onto its current hex. |
| Transform | State | Armor shifts, joints realign, and the Unit reconfigures into its alternate form.
Unit shifts into its Alternate Form, gaining bonuses from that form. Weapons with the [GB] tag may also Transform. Use again to revert. |
| Purge Buildup | State | The Unit vents pressure and heat, clearing away harmful environmental effects.
Roll a single D8 die. On a 5+, remove one stack of a buildup status effect. On a 4-, no change. |
| Kneeling Position | State | The Unit braces itself, lowering its stance for improved stability and accuracy.
Mech Units ONLY Unit kneels, gaining +1 Accuracy Rolls but cannot Evade. May be used once per turn. Unit must use Recover to stand. |
| Prone Position | State | The Unit drops flat against the ground, becoming a low, steady firing platform.
Mech Units ONLY. Unit gets into a prone position, gaining +3 to Accuracy Rolls but cannot Evade. Must kneel before getting into or out of the prone position. Cannot enter the prone position if its facing direction is obstructed by a Structure or another Unit. |
| Takeoff | State | Engines roar to life as the Unit propels itself back into the sky or ocean.
The Unit moves 3 hexes straight and changes Elevation by 1 to regain Airborne or Submerged status. The Unit cannot Evade during this activation. If any hex in its path imposes a movement penalty, the Unit still moves forward but remains Grounded. |
| Offensive Stance | Stance | The Unit prepares to attack any enemy entering its Field of View (FoV) and weapon range.
Mech Units only Enter Offensive Stance by choosing a ranged weapon, reserving its AP cost, and selecting a direction to focus the Unit’s Line of Sight. The reserved AP cannot be used for other actions. If an enemy Unit crosses this Line of Sight while within the weapon’s range, the Unit immediately makes an Attack with that weapon, interrupting the enemy’s movement. The first Unit to do so becomes the target. A Unit crosses the Line of Sight when its movement path passes across the focused line extending from the Unit. The stance ends if:
While in this stance, the Unit cannot Evade. |
| Defensive Stance | Stance | The Unit braces using a Shield or Two-Handed Weapon, redirecting all incoming damage from its front arc to that item.
Mech Units only When a Unit enters Defensive Stance, choose one equipped Shield or Weapon. All incoming damage to the Unit is redirected to the chosen item instead. While in this stance, the Unit cannot change facing or Evade. The stance ends immediately if the chosen Shield or Weapon is destroyed, or at the start of the Unit’s next activation. |
| Parry Stance | Stance | The Unit enters a guarded combat posture, prepared to deflect incoming melee strikes.
Mech Units only While in Parry Stance, the Unit may parry one successful melee attack against it, negating all damage from that attack. The Unit must have at least one Arm Unit Section to perform a parry. The stance ends after the parry is made or at the start of the Unit’s next activation. |
| Deploy | Order | The drone launches from its bay, entering the battlefield to extend the Unit’s reach.
Place 1 attached AI or Non-AI Drone on a hex within 2 hex radius of the Main Unit facing any direction. |
| Guidance | Order | The Unit feeds targeting data to its drone, directing it to assist with precision strikes.
Activate a linked AI Drone. Once the AI Drone becomes Inactive, the Main Unit continues its activation. |
| Recall | Order | The drone disengages and returns to the Unit, awaiting further commands.
Remove 1 AI or Non-AI Drone from a hex within 2 hex radius of the Main Unit and attach it to the Main Unit. |
| Reposition | Order | The drone shifts its position across the battlefield to gain a tactical advantage.
Move 1 hex in any direction but it must remain within 2 hexes of the Main Unit. |
Transforming
Some Units are capable of shifting from a Base Form to an Alternate Form. Transforming represents a Unit changing its physical structure and mode of operation to gain new abilities and restrictions.
When a Unit transforms, its stats, movement, and abilities switch to the Alternate Form, while any existing damage or status effects are retained. A Unit may only transform once per activation.
Transforming Units use a Datasheet marked with a “T” in the bottom right corner. On the datasheet, a Unit’s Base Form stats are marked with a single arrow, while its Alternate Form stats are marked with a diverging arrow.
A transforming Unit’s Base Form is always a Mech-type, and its Alternate Form is always a Vehicle-type. The [Transform] Command Action allows the Unit to switch between these forms.
While in its Alternate Form, the Unit gains all bonuses and restrictions associated with that Movement Mechanism
Falling & Fall Damage
A Unit falls when it is thrown, pushed, or otherwise forced from its position into a hex below its current elevation.
Fall Damage formula: 2 x (Unit Class x Elevation Height) When a Unit falls:
- Distance – Measure the number of Elevation Levels the Unit descends before reaching a valid impact area.
- Impact – Upon impact, the Unit takes Fall Damage to its Torso or Cockpit Unit Section.
Special Rule:
- Landing in a Blue Hex reduces fall damage by half (rounded up).
Example: Unit A is a Class 4 mech flying above the battlefield at the +3 elevation. It takes enough damage from Unit B to lose the [AIR] movement mechanism. Unit A immediately falls to Ground Level and suffers [2x(4x3)] 24 Torso damage.
Drone Operations
Drone Operations outlines how drones with Artificial Intelligence, and without, function on the battlefield. This section explains what they are, their control requirements, activation timing, and interaction with their assigned Main Units.
A.I. Drones
AI Drones are autonomous Units controlled by artificial intelligence. Each AI Drone is considered its own Unit and therefore has its own Datasheet. The pilot assigned to an AI Drone must be an AI, selected during Rank/AI selection. AI Drones cannot be deployed independently and must be deployed with its Main Unit, a Mech or Vehicle Unit with a Human Pilot to which the Drone is linked.
To control an AI Drone, a few requirements need to be met by both the Main Unit and the AI Unit.
Main Unit:
- Must have the Drone Management Mod.
AI Drone Unit:
- Must have the Drone Agent Mod.
- Its deployment cost must not exceed the deployment cost of the Main Unit its linked to.
During gameplay, an AI Drone may be activated during its Main Unit’s activation via the [Guidance] Command Action. Once activated, the AI Drone functions as a normal Unit, following standard activation and combat rules.
If the AI Drone is not activated during its Main Unit’s activation, it may instead activate normally on its own turn.
Non A.I. Drones
Non-AI Drones are small, remotely controlled auxiliary weapons that operate under the direct control of a Main Unit. These drones serve as extensions of the Main Unit’s offensive or defensive capabilities rather than functioning as independent Units.
Non-AI Drones are listed on the Main Unit’s Datasheet under the Weapons and Equipment Inventory module like any other weapon or equipment. However, they gain the [DR] tag in addition to the tag representing their Movement Mechanism: [TRS], [AIR], or [AQN]. The [DR] tag identifies the weapon or equipment as a Non-AI Drone and allows it to act as such. To field Non-AI Drones, the Main Unit must have the Drone Management Mod equipped, and each Drone must be physically attached to the Main Unit at deployment. A Unit may have no more than 3 Non-AI Drones deployed on the battlefield at one time, regardless of how many it has equipped unless stated otherwise.
After deployment, Non-AI Drones can be released using the [Deploy] Command Action (one Drone per CA) and placed anywhere within a 2-Hex radius of the Main Unit, facing any direction. Once deployed, drones move in tandem with the Main Unit but maintain their initial facing regardless of the Main Unit’s orientation. They also follow standard Hex Occupancy rules.
Individual Drones may be repositioned after deployment using the [Reposition] Command Action. If the Main Unit is destroyed, all deployed Non-AI Drones immediately become inactive and fall to the ground.
Deviation
.png)
A Deviation Roll is only made when specified by a weapon or ability. If that weapon or ability fails its Accuracy Roll, make a Deviation Roll.
Roll a d8 for each missed attack. The result of each roll determines the hex where that attack lands, as shown in the Deviation diagram. The arrow shows where the targeted Unit is facing.
After determining the landing hex for all missed attacks, resolve each attack from its final location. The targeted hex and all adjacent hexes are affected.
All Units (including allied Units) in those hexes take 50% of the attack’s damage, rounded up, applied to their Torso Unit Section or Cockpit. Units affected may conduct a Defensive Roll.
Weapon Redundancy
A Weapon with multiple copies reduces its AP Cost by 1 for each additional copy after the first, to a maximum reduction of 4 AP. A Weapon’s AP Cost cannot be reduced below half of its original value (rounded up).
If this reduction would lower the AP Cost to 2 or less, set the AP Cost to 2 instead. For every two copies of that Weapon (including the first), increase its Base Damage by 1.
These effects are based on the current number of copies in use. If copies are removed or destroyed, adjust the Weapon’s AP Cost and Base Damage accordingly.
Example: Unit A has 4 missile pods mounted to its back. Each missile pod has an AP Cost of 5 and a Base Damage of 12. Applying Weapon Redundancy reduces the AP Cost to 3 (half of 5, rounded up). Since the AP reduction has reached the minimum allowed value, any additional copies no longer reduce AP Cost and instead increase Base Damage. With 2 remaining copies, the Weapon gains +1 Base Damage, increasing it to 13. If Unit A loses 2 missile pods, then the weapon redundancy is adjusted and loses the damage increase bonus.
Terrain

Battlefield terrain can include anything from towering buildings to small rocks and trees. Some features are mission-specific, while others are represented by colored hexes, each providing unique advantages or disadvantages. Terrain can affect movement, line of sight, and combat outcomes, so its placement is a key part of battle strategy.
Elevations
Elevation adds a tactical layer to the battlefield, providing Units with advantages in movement and combat positioning. The game uses six elevation levels: -2, -1, 0, +1, +2, and +3. Ground Level (0) represents table height and is where most engagements occur unless otherwise specified by the Mission.
Each elevation level represents a 4.5 inch difference from the one above or below it. This can be measured by standing an Action Base 4 or 5 vertically (point-to-point).
Blue Hexes, which represent negative elevations such as lakes or oceans, can only be placed on Ground Level (0). The +3 Elevation level is reserved for Units with the [AIR] Movement Mechanism, representing high-altitude or flight-level movement. Only Units capable of flight can occupy or move through this elevation.
A Unit’s elevation is determined by its center mass, typically the waist for Mech Units and the cockpit for Vehicle Units. If the Unit’s center mass is higher or lower than 4.5 inches from its current elevation, it is considered to be at the next level. The same rule applies to Structures and Terrain features.
If a Unit moves to an elevation other than Ground Level, place an elevation token beside it to mark its current elevation for reference.
High Ground Bonus
When an attacking Unit is at a higher elevation than its target, it gains a High Ground Bonus (HGB). The bonus value is determined by the elevation difference between the attacker and the target. Units attacking targets at higher elevations do not receive this bonus. Bonuses do not stack.

Hex Colors
Hex Colors represent different types of terrain and environmental conditions on the battlefield. Each color corresponds to a specific terrain type that provides unique effects, advantages, or restrictions to Units occupying or moving through those hexes.
When setting up a battlefield, Hex Colors must be placed according to the Mission or Terrain rules, with different colors placed at least one hex apart unless otherwise stated.
Some Hex Colors also indicate elevation changes or environmental hazards, such as water, rubble, or impassable terrain.
Grey Hex
Grey Hexes represent clear, open terrain. Flat ground free of obstructions or environmental hazards. Units moving or fighting within Grey Hexes experience no bonuses or penalties. These hexes serve as the standard terrain type for most battlefields.
If a hex isn’t clearly marked as having another color, assume its grey.
Green Hex
Green hexes represent areas covered in trees and dense foliage.
Standard Move actions cost +1 Movement Point per hex.
Apply a –1 Accuracy modifier for each Green Hex within a Unit’s Line of Sight to its target, representing the trees and dense foliage. This penalty stacks cumulatively.
A Unit occupying a Green hex gains the Conceal status effect.
Light Blue Hex
Light Blue hexes represent bodies of water that are shallow enough to reveal the bottom, yet deep enough to submerge an entire Unit beneath the surface.
These hexes represent –1 Elevation.
When a Unit enters or moves through a Light Blue Hex without the proper Movement Mechanism to operate in or above water, it gains the Euphotic status effect.
Dark Blue Hex
Dark Blue hexes represent the deepest regions of a body of water, areas devoid of light, subjected to crushing pressure, and near-freezing temperatures.
These hexes represent –2 Elevation.
When a Unit enters or moves through a Dark Blue Hex without the proper Movement Mechanism to operate in or above water, it gains the Abyssal status effect.
Red Hex
Red hexes represent superheated terrain, such as lava fields or other high-temperature surfaces, capable of damaging even heavily armored Units and vehicles.
Units using the [TRS] Movement Mechanism take 10 damage to all Unit Sections with the [TRS] tag when moving over a Red Hex.
Units with the [AIR] Movement Mechanism are unaffected.
Black Hex
Black hexes represent collapsed structures or debris. Thick black smoke and unstable footing make these areas treacherous for movement and targeting.
Standard Move actions cost +1 Movement Point per hex.
Units using [TRS] Movement Mechanisms must also roll 1d8 when entering a Black Hex; on a result of 1–2, the Unit takes 5 damage to all Unit Sections with that tag due to shifting rubble.
[AIR] Movement Mechanisms are affected by the movement penalty but ignore the damage effect.
Apply a –1 Accuracy modifier for each Black Hex within a Unit’s Line of Sight to its target, representing the thick smoke and dust. This penalty stacks cumulatively.
Tan Hex
Tan hexes represent arid, barren landscapes with minimal precipitation and loose, shifting ground. Standard Move actions cost +1 Movement Point per hex.
Units using the [AIR] Movement Mechanism ignore this penalty.
For every 2 Tan Hexes moved across in a single activation, a Unit gains 1 Sand Buildup Token.
White Hex
White hexes represent environments blanketed in snow and ice and are subjected to harsh, cold winds. Mechanical strain is increased under these conditions.
Standard Move actions cost +1 Movement Point per hex.
For every 2 White Hexes moved across in a single activation, a Unit gains 1 Ice Buildup Token.
Buildings & Structures

Structures can serve as cover, obstacles, or tactical objectives, and may be destroyed to alter the battlefield in a player’s favor.
Buildings and other Structures do not need to be placed on Black Hexes, but when destroyed, any hexes they occupy become Black Hexes to represent collapsed debris.
Some Structures are tall enough to reach higher elevations. To determine this, stand a standard hex vertically (4.5 inches); if the Structure’s height exceeds this, it occupies a higher Elevation Level.
Use the chart below to determine a Structure’s Defense Points, based on its size (number of hexes occupied) and height. The green values represent the most common Structure defenses. Use a d20 to track remaining Defense Points during play. When attacking a Structure, attack rolls are not required since all attacks automatically hit. Apply Base Damage as normal, and subtract any damage dealt from the Structure’s total Defense Value until it is destroyed.
To target a Unit positioned behind or within a Structure, you must first destroy the Structure, then make a separate attack against the intended Unit.
Non-Hex Terrain
Also referred to as Scatter Terrain, these are pieces of terrain not connected to a specific Hex Color or Structure. They can serve as visual decoration or provide Cover during gameplay. When setting up the battlefield, players should mutually agree on which pieces grant Cover and which are purely decorative.
Terrain Placement
Before deploying Units, players must construct the battlefield using terrain pieces. Terrain should create meaningful tactical choices without unfairly favoring either side.
Unless a Mission states otherwise, terrain is placed using the following guidelines:
- Players should use enough terrain to break up long lines of sight and provide multiple movement routes across the battlefield.
- Terrain should be distributed evenly across the play area, avoiding large empty zones or overly dense clusters in a single area.
- Elevated terrain should be limited in height and spread across the battlefield rather than concentrated in one area.
Players may place terrain using the following method:
Agreed Placement: Players take turns placing terrain pieces anywhere on the battlefield following the placement guidelines above. This method is recommended for casual play.
Once terrain is placed, players may not move terrain pieces unless a rule or Mission effect allows it. Missions may override or add to these rules by specifying required terrain features, fixed objective locations, or special placement conditions.
Missions
Missions define the framework in which battles take place. Each mission is built around three core elements: the Deployment Zones, the Primary Objectives, and the Secondary Objectives. Missions fall into two main categories: Standard and Narrative. Standard missions are designed to emphasize balance and fairness, giving each player an equal opportunity to succeed. Narrative missions prioritize storytelling and scenario-driven play and may result in intentionally uneven or asymmetric battles. The mission being played should always be chosen before the battlefield is set up.
Objectives
Objectives define how a game is won. Most commonly, this involves capturing or holding specific locations on the battlefield, but an Objective may be any condition that can be clearly measured with a success or failure outcome. Objectives defined by a Mission are referred to as Primary Objectives. These represent the main focus and intended method of victory for that mission.
Some missions may also include Secondary Objectives, which provide alternative scoring opportunities and can be used to help balance gameplay when opposing armies are not optimized for the Primary Objectives.
Deployment Areas
Deployment Areas define where Units are placed on the battlefield and how much space is available for deployment. Determining Deployment Area: The players can mutually agree on which Deployment Area to begin with or can roll a d8.
[ 1 or 8 ] – Reroll
[ 2 or 5 ] – Standard Deployment
[ 3 or 6 ] – Cornered Deployment
[ 4 or 7 ] – Long Side Deployment
Deployment Order: Players roll a d8; the higher roll chooses who deploys first. The other player chooses table side (A or B). The first player places one Unit in their deployment area, then players alternate placing Units. When one player has no Units left to place, the other deploys all remaining Units.
There are three base types of Deployment Areas:
-
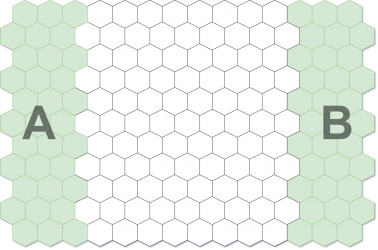 Standard Deployment
 -
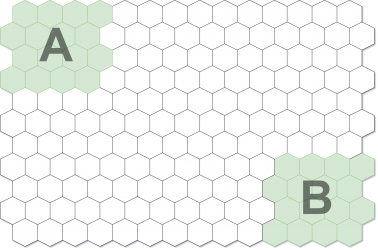 Cornered Deployment
 -
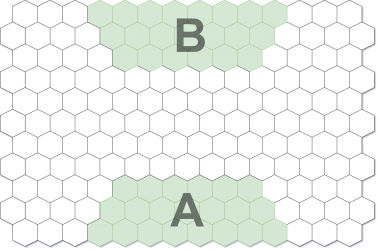 Long Side Deployment


Core Missions
These are the primary game modes used for regular play. These missions are designed to be balanced, repeatable, and suitable for any army composition. Each Core Mission provides a defined setup, deployment method, and set of objectives that both players follow.
Unlike Narrative Missions, which are story-driven scenarios with highly specific setups, Core Missions use shared rules and formats to ensure fair and consistent gameplay. Only Core Missions are included in this rulebook. Narrative based missions are available separately on the official website.
The following section presents the available Core Missions and their rules in the following format:
- Mission Name
- Engagement Size
- Deployment
- Primary Objective
- Objective Scoring
- Game Length
- Victory Condition
High-Value Target (HVT)
Deployment:
- Any
Primary Objective:
- Each player chooses one Unit from their squad to be their designated High Value Target.
Objective Scoring:
- For each enemy Unit destroyed, the player who destroyed it gains 1 Victory Point (VP).
- If the destroyed Unit was the enemy HVT, that player gains 3 Victory Points instead.
Game Length:
- The battle lasts 6 rounds or until one player has no Units remaining.
Victory Condition:
- The player with the most Victory Points at the end of the 6th round is the winner.
Command & Control
Deployment:
- Standard (Recommended)
Primary Objective:
- The player with initiative rolls 1d4 + 2 to determine the total number of Objective Markers to be placed on the battlefield. Players alternate placing these Markers down starting with the player who moves first.
- Each player may place only one Objective Marker within their own Deployment Area.
All Markers must be placed at least 4 hexes away from any other Marker and must also be 1 hex away from the tables edge.
- Markers may not be placed free-floating on higher elevations.
Objective Scoring:
- If a Unit ends it turn on an Objective Marker, that marker is considered captured by that Units player.
- At the end of each round, a player gains 1 Victory Point for each Marker they control. Objective Markers located within the opponents Deployment Area are worth 2 Victory Points instead.
- A captured Objective Marker remains under a players control even if the Unit moves away, until an opposing Unit ends its turn on that Marker and captures it.
Game Length:
- The battle lasts 6 rounds.
Victory Condition:
- The player with the most Victory Points at the end of the 6th round is the winner.
- If tied, the player who lost the fewest Units wins.
- If still tied, the game is a draw.
Asset Retrieval
Deployment:
- Long Side (Recommended)
Primary Objective:
- The player with Initiative places one Objective Marker on the battlefield. The Marker must be placed at least 4 hexes away from any Deployment Area.
Objective Scoring:
- If a Unit is on the same hex as the Objective Marker and has a free hand or manipulator, it may use the [Retrieve] Command Action to pick up the Marker.
- The hand or manipulator holding the Marker cannot be used for any purpose while carrying it, including for the [Grapple] Command Action or for two-handed weapons.
- A Unit carrying the Marker may use the [Release] Command Action to place the Marker on its current hex.
At the end of each round:
- A player gains 2 VP if one of their Units is carrying the Marker.
- A player gains 1 VP if one of their Units is on the same hex as the Marker but not carrying it.
Game Length:
- The battle lasts 6 rounds.
Victory Condition:
- The player with the most Victory Points at the end of the 6th round is the winner.
- If tied, the player who lost the fewest Units wins.
- If still tied, the game is a draw.
Control Points
Deployment:
- Cornered (Recommended)
Primary Objective:
- The player with initiative rolls 1d4 + 2 to determine the total number of Objective Markers to be placed on the battlefield. Players alternate placing these Markers down starting with the player who moves first.
- Each player may place only one Objective Marker within their own Deployment Area.
All Markers must be placed at least 4 hexes away from any other Marker and must also be 1 hex away from the tables edge.
- Markers may not be placed free-floating on higher elevations.
Objective Scoring:
- For If a Unit occupies the same hex as an Objective Token at the end of the round, that player gains 2 VP.
- However, if an opposing Unit is within 1 hex of that Objective Token, no VP is awarded for that token this round.
Game Length:
- The battle lasts 6 rounds or until one player has no Units remaining.
Victory Condition:
- The player with the most Victory Points at the end of the 6th round is the winner.
- If tied, the player who lost the fewest Units wins.
- If still tied, the game is a draw.
| Core Rules | |
|---|---|
| Core Rules | Unit Datasheet Creation | Abilities | Lore | |
